Please login or register.

Login with username, password and session length
Advanced search  
Pages: 1 ... 14 15 [16] 17

Author Topic: Mikey's build of his 2000 FXR4  (Read 49651 times)

0 Members and 1 Guest are viewing this topic.

fxr4mikey

  • Elite CVO Member
  • *****
  • Offline Offline
  • Posts: 742
Re: Mikey's build of his 2000 FXR4
« Reply #225 on: March 02, 2009, 09:12:20 PM »

Alrighty Then !!!

More progress on the build .... got the pistons ringed, installed into the cylinders, put the cylinders on the bike, put the heads on the cylinders, torqued them down, started the install of the intake manifold ....

first use a sharpie to mark the direction of the arrow that's on the top of the cylinder ... Nice tip from my Good Friend Harley !  Thanks Harley !


here's the rear cylinder, upside down, the piston (with rings installed) and the ring compressor.  I oiled all of the rings before I installed them, then I put assembly lube all the way around the piston. Starting from the 'top' of the piston and going down to the space below the oil wiper.  I also put assy. lube inside the ring compressor to make it easy to knock the piston out of the compressor.  I didn't get any shots of that process ... messy hands for sure .... I used the wooden end of a plastic dead blow hammer to tap on the inside of the piston to drive it down into the cylinder.  You have to pay attention to how far you put it into the cylinder. .... leave enough room for the wrist pin to clear ....


Here's the piston in the cylinder .... arrow pointing to the left (front) ....


here you can see that there is room for the wrist pin to clear


just for the fun of it, I took a shot down into the cylinder ... you can see that the arrow is pointing to the front ..... the cut-out in the side of the cylinder is the space used by the push rods ....... I know all you wrenches already know all this stuff .... I'm just trying to help the guy, like me, who's never done it before.


here's the cylinder with the piston installed and sitting 'upright'  you'll notice that I've installed the wrist pin into the piston already. Thanks Steve for that tip !!
Install it just short of the entry for the connecting rod .... this way you won't have to stop after you put the cylinder down over the studs and try to find the wrist pin, or pick it up from somewhere. In the photo, it might look like it, but it's not, .... that the cylinder is sitting down on the top edge of the wrist pin .... it's not


[COLOR="Red"]EDIT:[/COLOR]
[COLOR="Blue"]Don't do like I did (I got lucky)  I FORGOT to stuff some rags in the crank case holes so as not to drop anything in there.....like a cir clip 
[/COLOR]

here's the rear one on, wrist pin installed (more on this in a minute) and getting ready to install the cir clip.


cir clip being installed ..... see my earlier post on this .... once you get that idea down, it's EASY ..... Not one of them went FLYING!!!


then I took the head bolts .... I know they look like 'zhit' but there's NOTHING wrong with them  ... and you can't see them anyway ..... and put some oil in the cap, dipped my finder in it and lubed the shoulder of the head bolts, and the bottoms of them. I had already oiled the inside threads a couple of weeks ago by dipping an old cyl stud in oil and screwing that into the head bolts.


here she is with her first new head !!!
I used James base cylinder gasket, and Cometic head gaskets. Both come with torquing instructions ... I followed the Cometic instructions and pattern.  I've also decided that even I were to use stock HD head gaskets (but I would NEVER) that I'd still follow the Cometic torquing instructions.

ain't she PRETTTTTTY !!!!!!!!!!!!!!!!!!!!!!!!!

here's the second one going on -  you can see the wrist pin already started


then, working from the other side, you can look into the hole for the wrist pin and align the connecting rod and push the wrist pin through ...... :-)   Thanks again Steve !!
It took a few maneuvers to get it aligned, but it was pretty straight forward and not difficult. You just have to hold the cylinder/piston, move it up and down, you might have to move the connecting rod, reach through to the other side with you other hand, and start pushing on the wrist pin .... once it starts to go in keep pushing on it until it seats up against the cir clip that was already installed on the work bench...
« Last Edit: March 02, 2009, 09:35:09 PM by fxr4mikey »
Logged
2000 FXR4 Candy Tangerine
The Build -
•   SE Heads w/Cometic .030 gaskets
•   Bob Wood W6 cam
•   Mikuni HSR42 carb
•   Compu-Fire Single Fire Ignition
•   Rivera taper-lite chromolly adjustable push rods
•   Chrome lifter blocks w/HD B lifters
•   Pro-Force One AC and breather kit
•   Vance and Hines straight shots

fxr4mikey

  • Elite CVO Member
  • *****
  • Offline Offline
  • Posts: 742
Re: Mikey's build of his 2000 FXR4
« Reply #226 on: March 02, 2009, 09:12:46 PM »

here she is with both of her new heads !!!!!!!!!!!   I LOVE THIS BIKE !!!!!!!!!!  She is BEAUTIFUL !!!!!!!!


so then I set about to install the intake manifold. If you do this step now, BEFORE you install the rocker boxes you'll have more room to work.

here's the old seal coming out


here's a closer look at what the seals look like .... be sure to install the flange FIRST, and the bevel side of the seal goes 'in' towards the flange.


here's the loosely fit intake manifold .... got late, got tired, got cold ...... tomorrow is another day .....
Logged
2000 FXR4 Candy Tangerine
The Build -
•   SE Heads w/Cometic .030 gaskets
•   Bob Wood W6 cam
•   Mikuni HSR42 carb
•   Compu-Fire Single Fire Ignition
•   Rivera taper-lite chromolly adjustable push rods
•   Chrome lifter blocks w/HD B lifters
•   Pro-Force One AC and breather kit
•   Vance and Hines straight shots

sadunbar

  • 10K CVO Member
  • ****
  • Offline Offline
  • Posts: 11416
  • EBCM # Stealth - SSBS # 1.1 - SoA # Z&E2525 .01%
    • IL


    • CVO1: 2007 FLHTCUSE2
    • CVO2: 2000 FXR4
Re: Mikey's build of his 2000 FXR4
« Reply #227 on: March 02, 2009, 09:35:16 PM »

It's great fun to follow along as you progress with your build, Mikey!  You're doing a great job and providing a great service for the next guy that takes the plunge.   :2vrolijk_21:
Logged
2007 Screamin Eagle Ultra Classic - Light Candy Cherry and Black Ice
Screamin Eagle 120r
Revolution Performance EMS
Fuel Moto Jackpot headpipes and 4.5" Pro Touring Mufflers
HPI 55mm Throttle Body w/5.3 injectors
BDL clutch w/VPC92T
Traxxion AK-20
Legend Air Suspension
Brembo Brake Calipers/Rotors
Garmin Zumo
575 Chubby's
Bushtec Quantum

Black Diamond

  • 2.5K CVO Member
  • **
  • Offline Offline
  • Posts: 3363

    • CVO1: 11 FLHXSE2 "Vanessa"
    • CVO2: 08 FLHRSE4 "Lexi" "Bike from Hell"
    • CVO3: 02 FLHRSEI "Ruby"
Re: Mikey's build of his 2000 FXR4
« Reply #228 on: March 02, 2009, 10:09:10 PM »

Mike   Great stuff! Can't wait till she's done. I know your a proud papa....

JW
Logged

zn14

  • Newbie
  • *
  • Offline Offline
  • Posts: 47
Re: Mikey's build of his 2000 FXR4
« Reply #229 on: March 03, 2009, 09:47:30 AM »

thanks mikey,
after following your build I now wouldn't hesitate to do the same.
THANKS
Logged

fxr4mikey

  • Elite CVO Member
  • *****
  • Offline Offline
  • Posts: 742
Re: Mikey's build of his 2000 FXR4
« Reply #230 on: March 03, 2009, 05:49:28 PM »

thanks mikey,
after following your build I now wouldn't hesitate to do the same.
THANKS

nz14 - Now that right there is one of the key reasons I've been going through the effort of documenting this !!
Best of Luck to you when you decide to do it !!!  It's not that hard !!
If you've read all of my stuff, you'll know that this is the FIRST TIME that I've EVER seen the inside of an engine.  I had some hesitation getting started for sure !  But once I started buying the parts, I knew it was only a matter of time until I had to face my fears.  Like so many other times in my life, my fears were WAY larger than the situation called for.
For this one, there really is no fear to be had.  Just stay calm, double check your work, proceed slowly and deliberately with purpose.  I can't tell you how many times I've read, and re-read the sections of the service manual that deal with the engine and the areas that I'm working on........
I don't work on it when I'm tired, and when I don't 'feel like it'.   When I'm working on the bike, my mind is 'charged' / 'excited' about what I'm doing, full of energy and excitement about something that I've never experienced before ............. KEWL STUFF !!!!!!!!!!!!!!!


Wanted to say too, Thanks!!  to the rest of ya for all your kind words and support !!
Logged
2000 FXR4 Candy Tangerine
The Build -
•   SE Heads w/Cometic .030 gaskets
•   Bob Wood W6 cam
•   Mikuni HSR42 carb
•   Compu-Fire Single Fire Ignition
•   Rivera taper-lite chromolly adjustable push rods
•   Chrome lifter blocks w/HD B lifters
•   Pro-Force One AC and breather kit
•   Vance and Hines straight shots

FXR2evo99

  • Elite CVO Member
  • *****
  • Offline Offline
  • Posts: 983
  • LET IT BREATHHHHEEEE BABY LET IT BREATHEEEE
Re: Mikey's build of his 2000 FXR4
« Reply #231 on: March 12, 2009, 03:42:31 PM »

For those interested here is a "link" to the completion of Mikey's FXR4 Build:

CLICK HERE

Mikey's build came out quite nice......his attention to detail and his willingness to pass along his experiences will undoubtedly be helpful to so many other FXR Owners......I am sure glad he took his time to share it with all of us!!!!!1

 :bananarock:

Regards,

Tim
« Last Edit: March 12, 2009, 03:44:30 PM by FXR2evo99 »
Logged

Stone Cold

  • Junior CVO Member
  • **
  • Offline Offline
  • Posts: 60
  • FLHRSEI.ORG

    • CVO1: 1999 FXR2
Re: Mikey's build of his 2000 FXR4
« Reply #232 on: March 13, 2009, 08:01:43 PM »

Great job Mikey :orange:

Bike looks great  :2vrolijk_21: Would love to hear it. Anyway you could upload a sound file???

 :beerchug: to a job well done!!!

Pete
Logged

fxr4mikey

  • Elite CVO Member
  • *****
  • Offline Offline
  • Posts: 742
Re: Mikey's build of his 2000 FXR4
« Reply #233 on: March 15, 2009, 03:50:15 PM »

Great job Mikey :orange:

Bike looks great  :2vrolijk_21: Would love to hear it. Anyway you could upload a sound file???

 :beerchug: to a job well done!!!

Pete

actually, I think there is ... I'll work on that over the next few days and see if I can make it happen

:D
Logged
2000 FXR4 Candy Tangerine
The Build -
•   SE Heads w/Cometic .030 gaskets
•   Bob Wood W6 cam
•   Mikuni HSR42 carb
•   Compu-Fire Single Fire Ignition
•   Rivera taper-lite chromolly adjustable push rods
•   Chrome lifter blocks w/HD B lifters
•   Pro-Force One AC and breather kit
•   Vance and Hines straight shots

fxr4mikey

  • Elite CVO Member
  • *****
  • Offline Offline
  • Posts: 742
Re: Mikey's build of his 2000 FXR4
« Reply #234 on: March 15, 2009, 03:51:42 PM »

I'd like to put the rest of my build pictures in here .... but it's sorta a pita ... since a post is limited to 6K char, and doesn't provide me with any indication when I'm close, it just makes it harder to do
 
BUT .. I'm gonna try it .... I might give up, we'll see
Logged
2000 FXR4 Candy Tangerine
The Build -
•   SE Heads w/Cometic .030 gaskets
•   Bob Wood W6 cam
•   Mikuni HSR42 carb
•   Compu-Fire Single Fire Ignition
•   Rivera taper-lite chromolly adjustable push rods
•   Chrome lifter blocks w/HD B lifters
•   Pro-Force One AC and breather kit
•   Vance and Hines straight shots

fxr4mikey

  • Elite CVO Member
  • *****
  • Offline Offline
  • Posts: 742
Re: Mikey's build of his 2000 FXR4
« Reply #235 on: March 15, 2009, 03:53:25 PM »

Home made tool for pulling out your wrist pins .....
I needed this to get mine out ... I could push them, but they seemed to get stuck when they got to the grove for the cir clip, this was EASY !!!!!!!!!!

The parts for the tool


Wrist pin with the c clip still in


Head of carriage bolt against the wrist pin


Plastic pipe notch for clearance


Wrist pin partially removed


Wrist pin almost out and sliding into plastic pipe


Wrist pin completely out.


Parts for the tool - 8" long 5/16" carriage bolt, 5/16 wing nut, 5/16 fender washer, 5/16 nylon washer ( not really needed), a 3-1/2" long piece of 1" I.D. plastic pipe and a bottle of Makers Mark for me.
Logged
2000 FXR4 Candy Tangerine
The Build -
•   SE Heads w/Cometic .030 gaskets
•   Bob Wood W6 cam
•   Mikuni HSR42 carb
•   Compu-Fire Single Fire Ignition
•   Rivera taper-lite chromolly adjustable push rods
•   Chrome lifter blocks w/HD B lifters
•   Pro-Force One AC and breather kit
•   Vance and Hines straight shots

fxr4mikey

  • Elite CVO Member
  • *****
  • Offline Offline
  • Posts: 742
Re: Mikey's build of his 2000 FXR4
« Reply #236 on: March 15, 2009, 03:55:05 PM »

Gettin close now ....
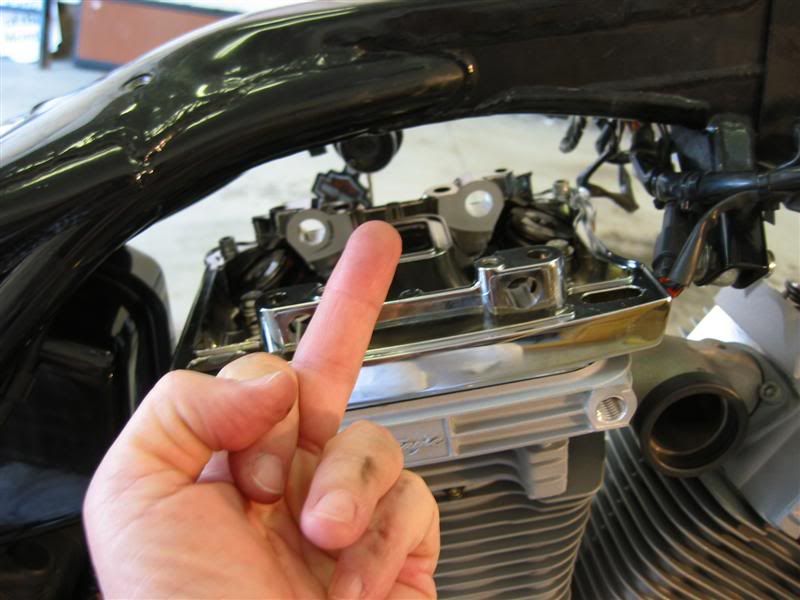
Got the mainfold, bottom rocker boxes w/rocker arms and push rods installed.

for all you wrenches out there reading this, remember, this is mostly an effort to help those that might not know, and for those who may be working on a FXR .... so of it is specific to the FXR, and MOST of it is common to any EVO.
 
Thanks to EVERYONE who has been helping me, and to all those reviewing and providing the kind Compliments and words of Encouragement

Here comes the pics ...

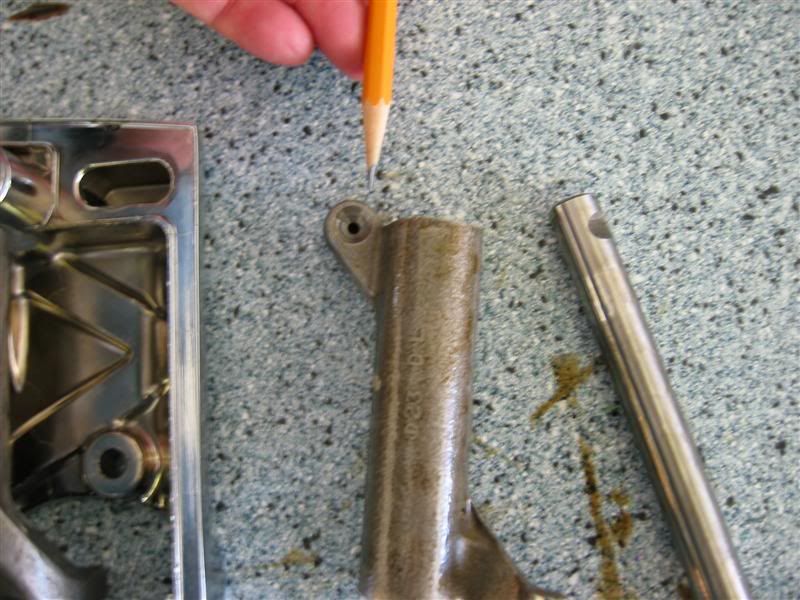
the manual says to make sure that the manifold is in an 'up right position'  I interpret that as to mean 'vertical'
so I placed a torpedo level on the face of the timing hole to see how the bike was sitting


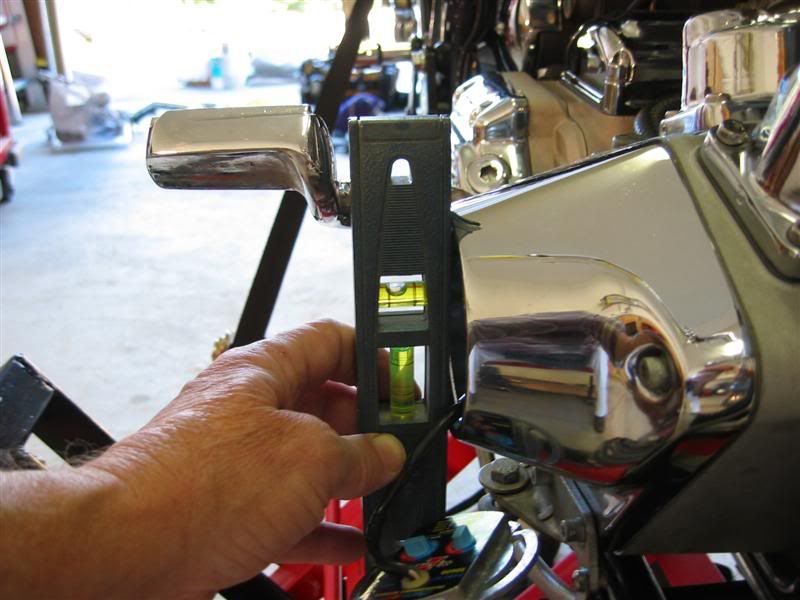
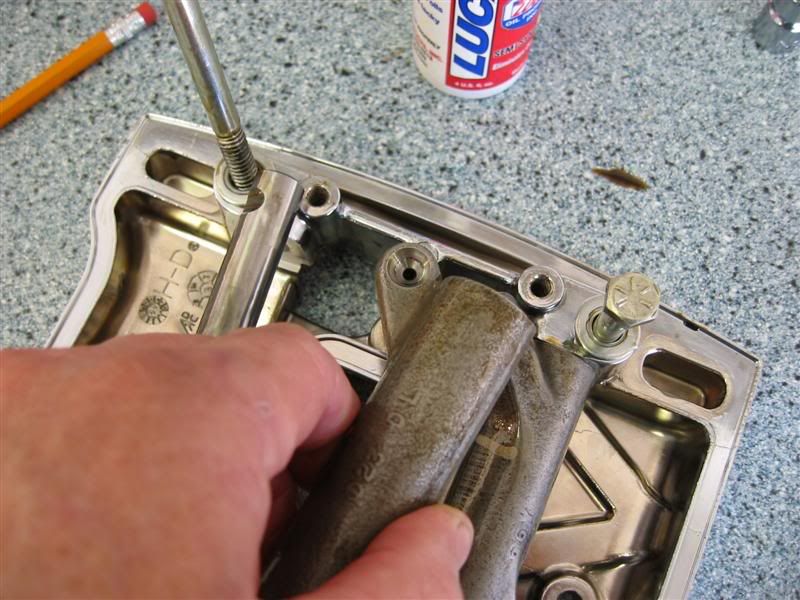
then I snugged up the bolts on the manifold, just enough to hold it into position, put the level on the face of the manifold and adjusted it to be the same as the way the bike is sitting


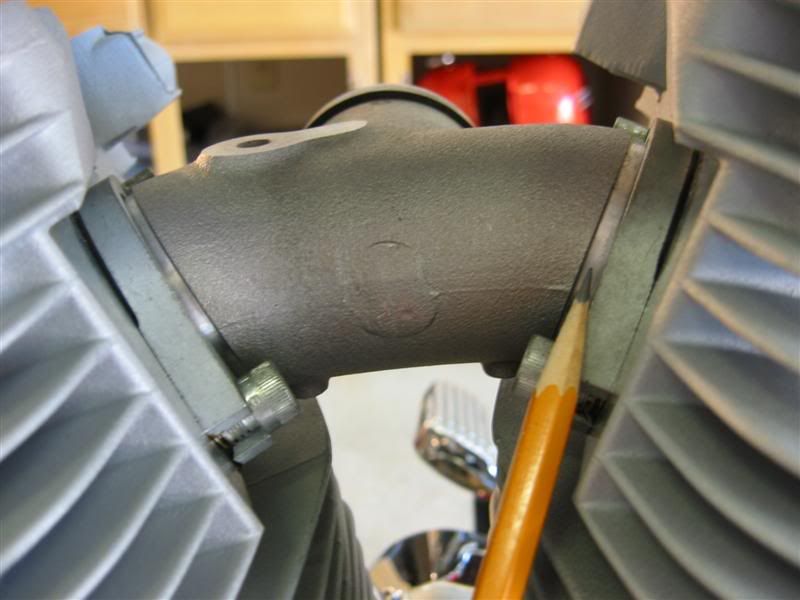
then I adjusted the manifold, as best that I could to be 'centered' between the two cylinders, obviously this is from the back side of the intake


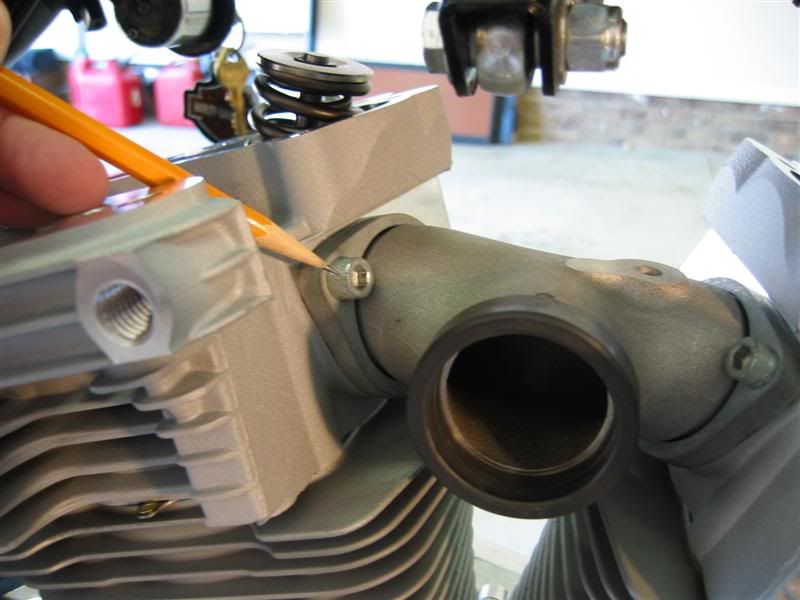
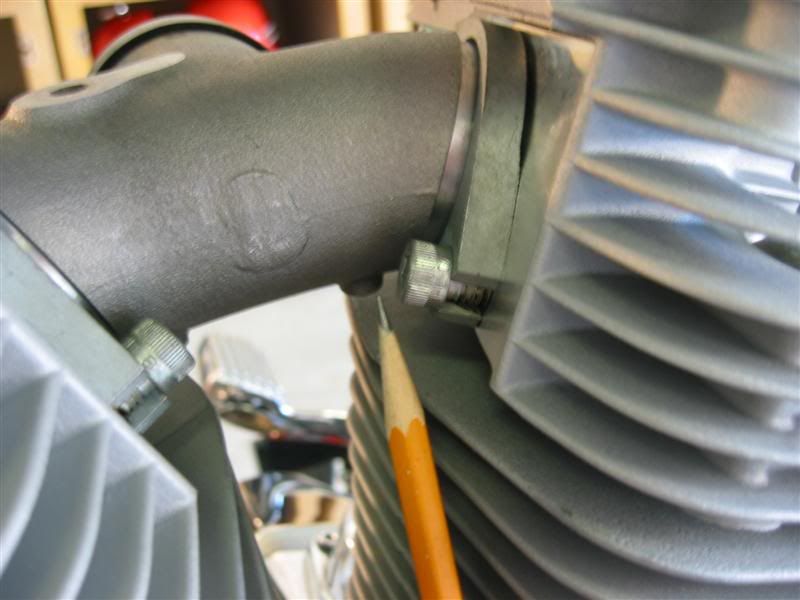
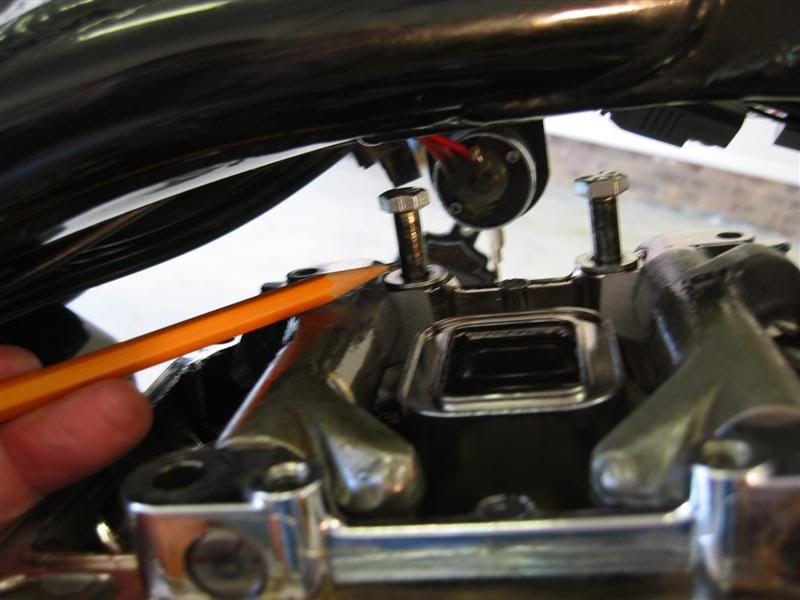
you can not put a torque wrench on the bolts that hold the manifold in place, not on the front or the back (I don't know how the HD Techs torque these bolts).  So I warmed up my arm, calibrated my bicep, put the dog leg allen  wrench in there and torqued them down (SM calls for 15-17 ft lbs)

front ones


back ones


then it was off to do the base rocker boxes
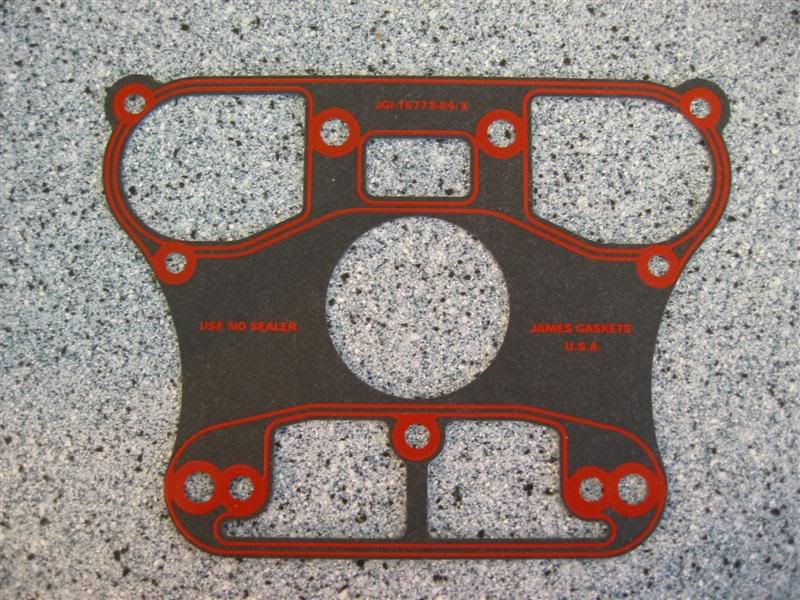
here's a picture of the pretty one peice James gasket .... dayum nice gasket
The large holes at the top of the pic is the side that goes over the valves and the other side is where the push rods come up into the heads and to the rocker arms


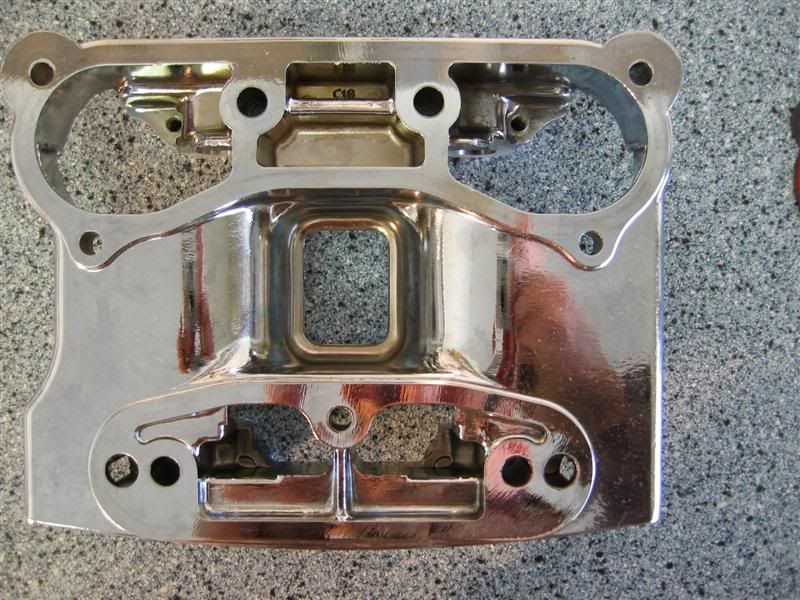
here's a pic of the bottom of the base rocker box, all pretty, shinny and clean !! all of the rocker boxes were cleaned using a parts cleaning brush and Simple Green


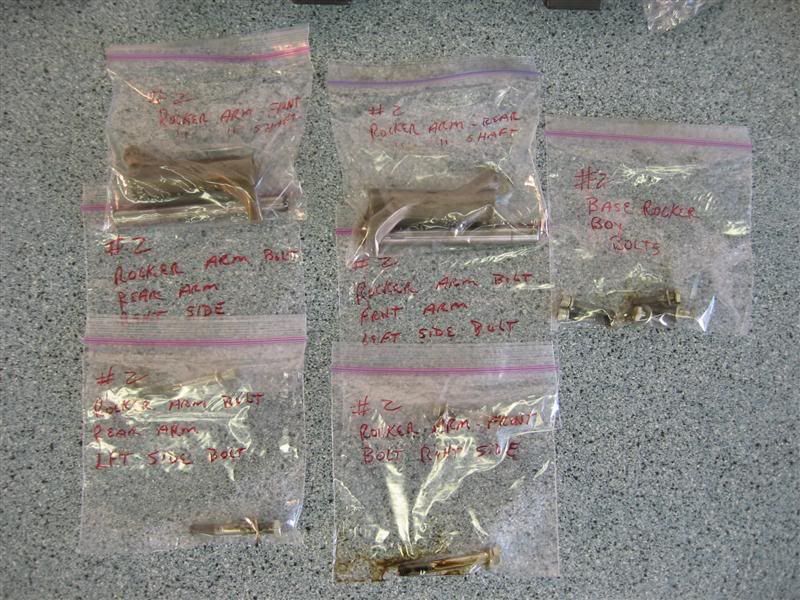
when I took it apart I put all the parts into baggies and labeled them. This insures that I get the same rocker arm shaft back into the same rocker arm that it was in before.
I had also labeled all of the positions that the bolts came out of .... .didn't matter this time because I put on new heads .... otherwise they would have all gone back into their original holes.  Here's the parts that go into the bottom rocker box ... starting with the rear (#2) cylinder


then I made my first Doof mistake of the day ........ I put the rocker box on, only to remember that the bolts on the rear (left side) for the rocker arms have to be installed WITH the rocker box, as there is NO ROOM to get those bolts in once the rocker box is installed


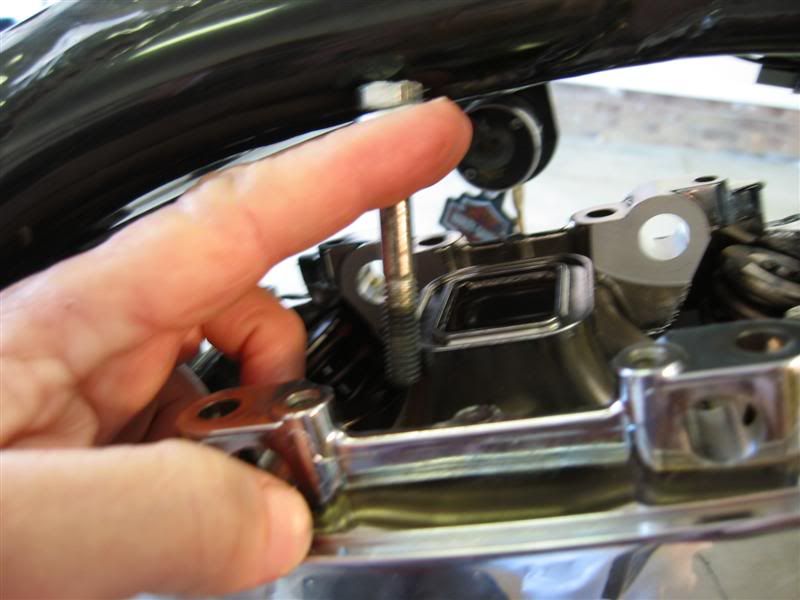
so the rocker box had to come back out


so then I decided to read the SM .... it says to install the rocker arms and shafts THEN install the rocker box .... but it DOES NOT mention that on the FXR4 you MUST (if doing this with the engine in the frame) drop those rocker arm bolts into the box BEFORE you put the box on the head
Here's what the assembly looks like

here's a shot of the bottom of the rocker arm ... the little hole is where the oil comes up from the pushrod and oils the rocker arm shaft ... you see the shaft to the right, and the notch that must line up with the bolt that holds the rocker arm in place


first one installed, the bottom of the photo is the left side of the cylinder


here's a shot of the rocker arm (upside down) the shaft (showing the notch) and the bolt


it is possible to install the rocker arms backwards in the rocker box ..... be sure that the push rod seat is on the right hand side of the box ..... yes, you can ask me how I know this .... but I might not tell you .... :D


first rocker box assembled and installed, with the rocker arm bolts in place


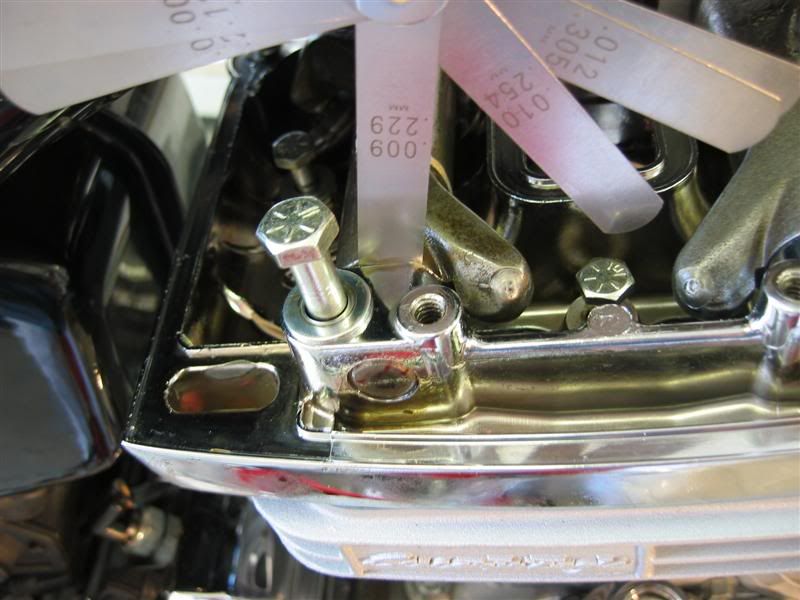
checking the end play on the rocker arm .... if I recall you can have up to .025 end play, mine measured .009 ..... good to go !


Logged
2000 FXR4 Candy Tangerine
The Build -
•   SE Heads w/Cometic .030 gaskets
•   Bob Wood W6 cam
•   Mikuni HSR42 carb
•   Compu-Fire Single Fire Ignition
•   Rivera taper-lite chromolly adjustable push rods
•   Chrome lifter blocks w/HD B lifters
•   Pro-Force One AC and breather kit
•   Vance and Hines straight shots

fxr4mikey

  • Elite CVO Member
  • *****
  • Offline Offline
  • Posts: 742
Re: Mikey's build of his 2000 FXR4
« Reply #237 on: March 15, 2009, 03:56:04 PM »

after you snug down all the bolts, you'll realize that there is no way to put a torque wrench on the bolts on the left hand side .....


so I called my Good Friend Harley and discussed this with him.  He told me about 'dog bones'.  So I needed a torque wrench adapter .... but I didn't have one, so I made one like this
started with a combination box end ratchet wrench


added to that a 3/8 to 1/2 inch ratchet adapter (Mike's torque wrench is 3/8 inch drive)


put all that together and had an adapter that I could put on those bolts


these two screws on the left side ... no torque wrench ... I used my calibrated right arm and set them ...


both bottom rocker boxes installed ..... YEAAAAAAAAAAAAHHHHHHHHHHHHHHH


I'm going out to work on it now ..... the push rods are already installed and adjusted, and I have the pictures ....  but want to go to the garage now .... so I'll post up more later


Logged
2000 FXR4 Candy Tangerine
The Build -
•   SE Heads w/Cometic .030 gaskets
•   Bob Wood W6 cam
•   Mikuni HSR42 carb
•   Compu-Fire Single Fire Ignition
•   Rivera taper-lite chromolly adjustable push rods
•   Chrome lifter blocks w/HD B lifters
•   Pro-Force One AC and breather kit
•   Vance and Hines straight shots

fxr4mikey

  • Elite CVO Member
  • *****
  • Offline Offline
  • Posts: 742
Re: Mikey's build of his 2000 FXR4
« Reply #238 on: March 15, 2009, 03:57:36 PM »

here's the rest of the assembly pics

getting ready to install the 'ez install, adjustable push rods'

the long one is the way they are shipped, collapse it down to install it


I put some assembly lube on all the 'O' rings before I installed them


then I installed the metal washer in the lifter block, then the 'O' ring, replaced the 'O' rings on the push rod covers, and installed the new 'O' rings in the heads where the push rods enter


then I put the tube over the push rod, installed it into the head, then the lifter block .....  and thanks to another GREAT TIP from my Wonderful Friend Harley, I made a clip/hanger with a paper clip and rubber band to hold the tube up out of the way while I adjusted the push rod


then I set about to adjust the push rod ... the instructions called for me to make 4 full turns .... these rods only have two flats on them, so that was easy.

First I adjusted the rods so that there was no vertical play, and the rod was 'SNUG'

Then I lined up one of the flats on the rod with a flat on the locking jam nut and marked both of them with a red sharppie ..... counted four turns and locked them down.


all four push rods installed and retainer clips installed


Then I got ready to install the middle and top rocker boxes. I replaced the umbrella valve with new ones. The new ones are from James, and sit differently in the box than the stock ones.  This concerned me a bit because the valve does not sit down tight against the bottom of the box.  I concluded that the pressure in the box would force the valve down, it's 'soft'. 
In this pic you can see the difference in the design, and why the James valve doesn't sit all the way to the bottom in the rocker box - james valve is on the left  :whistling:


Logged
2000 FXR4 Candy Tangerine
The Build -
•   SE Heads w/Cometic .030 gaskets
•   Bob Wood W6 cam
•   Mikuni HSR42 carb
•   Compu-Fire Single Fire Ignition
•   Rivera taper-lite chromolly adjustable push rods
•   Chrome lifter blocks w/HD B lifters
•   Pro-Force One AC and breather kit
•   Vance and Hines straight shots

fxr4mikey

  • Elite CVO Member
  • *****
  • Offline Offline
  • Posts: 742
Re: Mikey's build of his 2000 FXR4
« Reply #239 on: March 15, 2009, 03:58:03 PM »

then I removed all the old paper gaskets from the rocker box bolts and cleaned them up


all rocker boxes installed ... I had to use my 'calibrated right arm' to torque down all of the bolts on the lefthand side ...


OH Yeah, this is for anyone that has to lower your engine in the frame .... tilt your head over to the left and look at these two pics .... this is the frame right under the primary ... in order not to scratch things up, I took some foam pipe insulation and cut a little piece out of the center to make the opening large enough for the frame, placed it on the frame and lowered the engine


so now I set about to put the engined back up in the frame and hook up the motor mounts.


then the voltage reg and coil/bracket


then assemble the choke cable on the Mikuni carb
.... follow the instructions that come with your carb
on the top is the plunger and spring that comes with the Mikuni ... you'll notice that they are both larger than the stock HD stuff


then the battery  .... I don't know about 'other' bikes, but  dealing with the batt in the FXR4 is a PITFA !!!
You can't get ahold of it .... so I cut some strapping and placed it down under the battery so that it can be installed/removed easyly ..... also this allowed me to hold the battery up while I got the neg side bolt started...


and when finished just tuck the ends down into the case


here's a shot of the bottom of the front pipe ... got this mostly last Aug. up in Michigan doing the 'Circle Lake Michigan Tour' ..... :yikes:


when I started putting the exhaust on I couldn't help but notice the difference in the exhaust port from the stock heads ...
here's the stock exhaust port (yeah, I know, it's dirty and way to rich) - you might notice that the port consumes the entire 360 degree opening


here's the SE head


exhaust installed ....... my least favorite part of working on the bike .... exhaust   


and then the A/C .... and she's ready to FIRE !!  :woohoo::woohoo::woohoo:


Logged
2000 FXR4 Candy Tangerine
The Build -
•   SE Heads w/Cometic .030 gaskets
•   Bob Wood W6 cam
•   Mikuni HSR42 carb
•   Compu-Fire Single Fire Ignition
•   Rivera taper-lite chromolly adjustable push rods
•   Chrome lifter blocks w/HD B lifters
•   Pro-Force One AC and breather kit
•   Vance and Hines straight shots
Pages: 1 ... 14 15 [16] 17
 

Page created in 0.251 seconds with 20 queries.