Please login or register.

Login with username, password and session length
Advanced search  
Pages: 1 ... 10 11 [12] 13 14 ... 17

Author Topic: Mikey's build of his 2000 FXR4  (Read 60112 times)

0 Members and 1 Guest are viewing this topic.

FXR2evo99

  • Elite CVO Member
  • *****
  • Offline Offline
  • Posts: 983
  • LET IT BREATHHHHEEEE BABY LET IT BREATHEEEE
Re: Mikey's build of his 2000 FXR4
« Reply #165 on: February 07, 2009, 03:54:26 PM »

"....I would add that I have used these opportunities in the past to replace old fasteners with chrome or stainless.  If you're going to want to do that, now's the time......"

In thinking about this....I would suppose that the bolts to question changing would be the following when considering this particular modification of one's cam's and replacing of one's cylinder heads like Mikey has done...:

1) cam case cover bolts
2) lifter cover bolts
3) Rocker cover bolts
4) manifold bolts

as these are the only one's primarily exposed to view and the elements......the rest of the bolts are all internal....

I suppose "chrome" is always a choice as being what one likes.....I am curious if "Stainless Steel" verisons of these bolts would prove to have any benefits, anyone with comments?

UMmmmmm I am asking because basically I am in the same process as Mikey is but with my 2002 RKC right now....so everything is apart......

Mike (REDFXR2) also did you have any issues getting your manifold to refasten easily when you replaced your OEM heads with screamin eagle heads?

Oh and I did take out my grinder, and put a steel brush/wire wheel attachment on it  UMMMM MAKE SURE YOU WEAR GLOVES AND HAVE EYE PROTECTION....lol and put the grinder securely into my vice and cleaned the remaining 52 or so bolts....I began by using my cordless dremel tool....but those little wire brushs that you buy are like $3.30 each and heck by the time I had done 20 bolts I had nearly eaten up 2 of those brushes....and plus my "juice" ran out of my cordless dremel....so instead of waiting for my battery to recharge and burning through more of those dremel stainless steel brush attachments I simply went to another tool which worked perfectly......cleans them faster and better....but the dremel works well when you only have a few bolts to clean....but this project is a fairly large assortment of bolts.....

I realize the dealers nor indys would do this.....so at the end of the day are we silly for doing it or is there any evidence that says we would be stupid not to do it.....and if that's the case....why do we allow dealers or indys off by not doing it.....which gets me back to this point are the benefits preceived only in our minds or is there really a true benefit of doing this task....

LAUGHING....and you know if you sit down or stand up and clean over 70 bolts it's going to take a while just ask my friend ZN.....lol just another way for me to drive him NUTS.....LAUGHING........

 :bananarock:


Regards,

Tim
« Last Edit: February 07, 2009, 03:55:58 PM by FXR2evo99 »
Logged

RedFXR2

  • Guest
Re: Mikey's build of his 2000 FXR4
« Reply #166 on: February 07, 2009, 06:06:52 PM »

In thinking about this....I would suppose that the bolts to question changing would be the following when considering this particular modification of one's cam's and replacing of one's cylinder heads like Mikey has done...:

1) cam case cover bolts
2) lifter cover bolts
3) Rocker cover bolts
4) manifold bolts

as these are the only one's primarily exposed to view and the elements......the rest of the bolts are all internal....


I was only thinking about 1-3, as the manifold bolts are barely visible.

Isuppose "chrome" is always a choice as being what one likes.....I am curious if "Stainless Steel" verisons of these bolts would prove to have any benefits, anyone with comments?

Chrome bolts look nice but often just tightening them will fracture the chrome finish inside the allen head, leading to rust.  Stainless bolts won't rust and can be bought polished, looking nearly as bright as chrome, but good ones (Grade 8) are expensive.


Mike (REDFXR2) also did you have any issues getting your manifold to refasten easily when you replaced your OEM heads with screamin eagle heads?

I didin't do this, myself, but as far as I know the manifold mounts the same from stock to SE.

Logged

fxr4mikey

  • Elite CVO Member
  • *****
  • Offline Offline
  • Posts: 742
Re: Mikey's build of his 2000 FXR4
« Reply #167 on: February 07, 2009, 07:08:16 PM »

 
I've never had mine apart before, so I have no experience on cleaning all the bolts.

I do not intend to clean all the bolts before I reassemble the bike.

They go back in just the way they are.

I don't see where this is any kind of a problem or anything to be concerned about .....

for those of you who MAY think this is a concern, please provide 'ACTUAL' documentation that describes what problems one is exposed to by NOT CLEANING the bolts.
I'd like also to know the SOURCE of any such data, who compiled it, when, how it was collected and documented. I'd like to see a statistical analysis of the why clean and why not to clean

I don't like to do 'work' just 'because' or cause Granny said so, or because I'm just weird ...... LOL     :huepfenlol2: :huepfenlol2:


Thanks,
Mikey
Logged
2000 FXR4 Candy Tangerine
The Build -
•   SE Heads w/Cometic .030 gaskets
•   Bob Wood W6 cam
•   Mikuni HSR42 carb
•   Compu-Fire Single Fire Ignition
•   Rivera taper-lite chromolly adjustable push rods
•   Chrome lifter blocks w/HD B lifters
•   Pro-Force One AC and breather kit
•   Vance and Hines straight shots

fxr4mikey

  • Elite CVO Member
  • *****
  • Offline Offline
  • Posts: 742
Re: Mikey's build of his 2000 FXR4
« Reply #168 on: February 07, 2009, 07:11:28 PM »


Regards,

Tim

I'm still thinking .... it's not to late to order chrome bolts for these areas ..... prior to the tear down I had the plastic chrome caps on the bolts ..... ther're OK, but actual chrome bolts would be real nice.

One day last year I was at the stealer's place ... there was a bike outside that had ALL CHROME BOLTS on the engine   ...... WOW ....... I really liked it too !!
Logged
2000 FXR4 Candy Tangerine
The Build -
•   SE Heads w/Cometic .030 gaskets
•   Bob Wood W6 cam
•   Mikuni HSR42 carb
•   Compu-Fire Single Fire Ignition
•   Rivera taper-lite chromolly adjustable push rods
•   Chrome lifter blocks w/HD B lifters
•   Pro-Force One AC and breather kit
•   Vance and Hines straight shots

sadunbar

  • 10K CVO Member
  • ****
  • Offline Offline
  • Posts: 11416
  • EBCM # Stealth - SSBS # 1.1 - SoA # Z&E2525 .01%
    • IL


    • CVO1: 2007 FLHTCUSE2
    • CVO2: 2000 FXR4
Re: Mikey's build of his 2000 FXR4
« Reply #169 on: February 07, 2009, 07:17:33 PM »


I've never had mine apart before, so I have no experience on cleaning all the bolts.

I do not intend to clean all the bolts before I reassemble the bike.

They go back in just the way they are.

I don't see where this is any kind of a problem or anything to be concerned about .....

for those of you who MAY think this is a concern, please provide 'ACTUAL' documentation that describes what problems one is exposed to by NOT CLEANING the bolts.
I'd like also to know the SOURCE of any such data, who compiled it, when, how it was collected and documented. I'd like to see a statistical analysis of the why clean and why not to clean

I don't like to do 'work' just 'because' or cause Granny said so, or because I'm just weird ...... LOL     :huepfenlol2: :huepfenlol2:


Thanks,
Mikey

hehe...  I think it would be less work to clean the threads then to write the report!!  I clean the threads so the loctite works as intended...read the instructions for the use of loctite.... that and I just can't bring myself to use gunked up threads....
« Last Edit: February 07, 2009, 07:33:12 PM by sadunbar »
Logged
2007 Screamin Eagle Ultra Classic - Light Candy Cherry and Black Ice
Screamin Eagle 120r
Revolution Performance EMS
Fuel Moto Jackpot headpipes and 4.5" Pro Touring Mufflers
HPI 55mm Throttle Body w/5.3 injectors
BDL clutch w/VPC92T
Traxxion AK-20
Legend Air Suspension
Brembo Brake Calipers/Rotors
Garmin Zumo
575 Chubby's
Bushtec Quantum

sadunbar

  • 10K CVO Member
  • ****
  • Offline Offline
  • Posts: 11416
  • EBCM # Stealth - SSBS # 1.1 - SoA # Z&E2525 .01%
    • IL


    • CVO1: 2007 FLHTCUSE2
    • CVO2: 2000 FXR4
Re: Mikey's build of his 2000 FXR4
« Reply #170 on: February 07, 2009, 07:20:00 PM »

I'm still thinking .... it's not to late to order chrome bolts for these areas ..... prior to the tear down I had the plastic chrome caps on the bolts ..... ther're OK, but actual chrome bolts would be real nice.

One day last year I was at the stealer's place ... there was a bike outside that had ALL CHROME BOLTS on the engine   ...... WOW ....... I really liked it too !!

Polished stainless bolts can shine just as much as chrome - and stay looking good longer that chrome bolts.  Chrome plating chips with use - then rusts.  If stainless bolts start to go dull, just polish them up!   :2vrolijk_21:
Logged
2007 Screamin Eagle Ultra Classic - Light Candy Cherry and Black Ice
Screamin Eagle 120r
Revolution Performance EMS
Fuel Moto Jackpot headpipes and 4.5" Pro Touring Mufflers
HPI 55mm Throttle Body w/5.3 injectors
BDL clutch w/VPC92T
Traxxion AK-20
Legend Air Suspension
Brembo Brake Calipers/Rotors
Garmin Zumo
575 Chubby's
Bushtec Quantum

fxr4mikey

  • Elite CVO Member
  • *****
  • Offline Offline
  • Posts: 742
Re: Mikey's build of his 2000 FXR4
« Reply #171 on: February 07, 2009, 07:25:53 PM »

OK, here's some photo's from todays work

here's the OLD camshaft oil seal being knocked out


here's the old, and new oil seal on the bench
the damage you see on the old one is from being removed, it actually didn't have much of any wear on it, but it's a 50 cent item to replace and takes 2 minutes


here's the new oil seal going in ... used a socket the size of the seal and hit it with a dead blow rubber mallet to seat it in the cam cover, EASY STUFF


oil seal after the install ... this is the inside of the gear housing cover, also called cam chest cover


stock INA inner cam bearing on the left, torrington replacement bearing on the right ..... I like the one on the right  :huepfenjump3:


what I'm showing here is the view through the hole where the inner cam bearing is installed ... look through it, you see the crank in the background .... when you want to 'REMOVE' the bearing, make sure to rotate the crank so that it IS NOT ALIGNED with the bearing .... I'll show you that in the 2nd pic from here


crank rotated so that it IS NOT aligned with the cam bearing ... this allows you to put a PILOT BEARING PULLER into the bearing for removal
you can't really 'see it' in this pic, but there is A LOT more room behind the cam bearing when you rotate the crank so that the crank arm is not directly behind the bearing


« Last Edit: February 07, 2009, 07:48:31 PM by fxr4mikey »
Logged
2000 FXR4 Candy Tangerine
The Build -
•   SE Heads w/Cometic .030 gaskets
•   Bob Wood W6 cam
•   Mikuni HSR42 carb
•   Compu-Fire Single Fire Ignition
•   Rivera taper-lite chromolly adjustable push rods
•   Chrome lifter blocks w/HD B lifters
•   Pro-Force One AC and breather kit
•   Vance and Hines straight shots

fxr4mikey

  • Elite CVO Member
  • *****
  • Offline Offline
  • Posts: 742
Re: Mikey's build of his 2000 FXR4
« Reply #172 on: February 07, 2009, 07:44:20 PM »

 
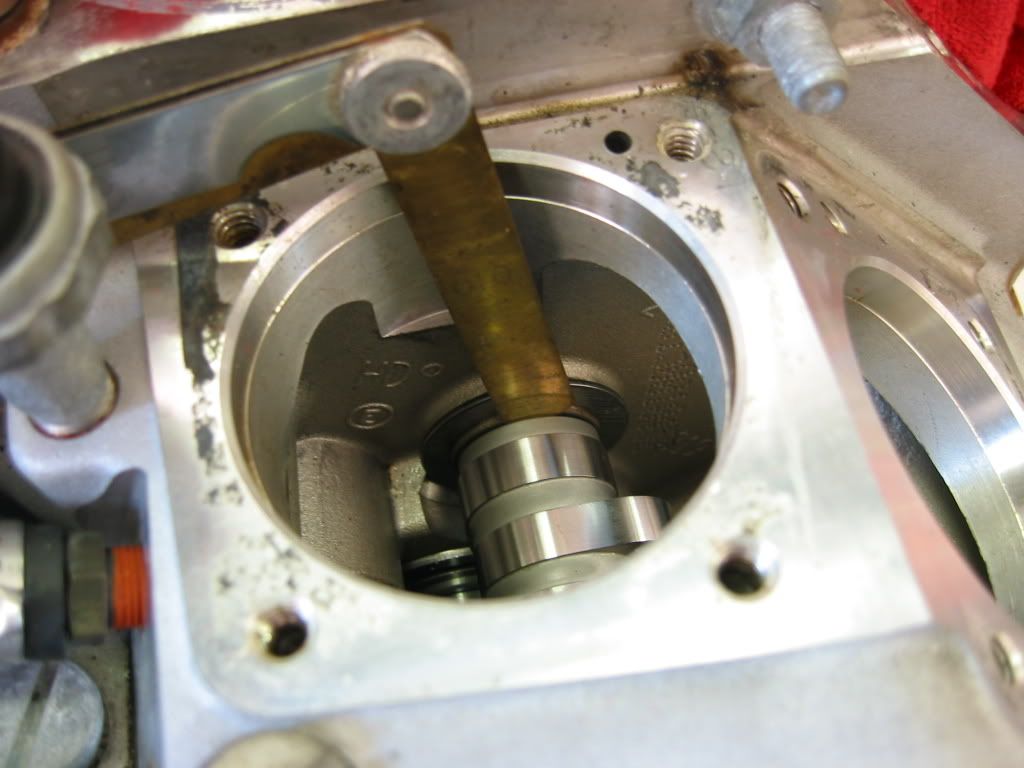
installing the new cam bearing ... use assembly lube, set the bearing in the hole firmly with your thumbs, one in the cam chest, the other from the top through the lifter block hole


use the butt end of a wooden hammer to start setting the bearing


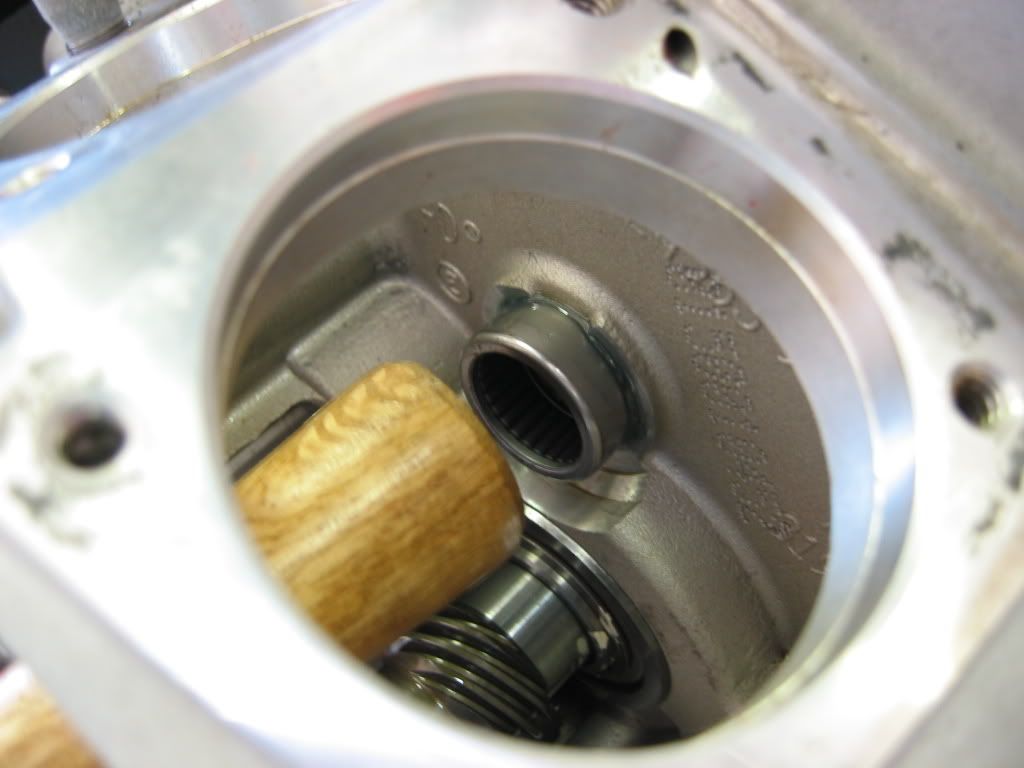
after I gave it a few light taps with that, I put the thrust washer on the OLD CAMSHAFT and inserted it into the bearing.
Then I hit the end of the camshaft with a rubber dead blow hammer .... I drove it in until I thought that it was seated, checked it with a flashlight
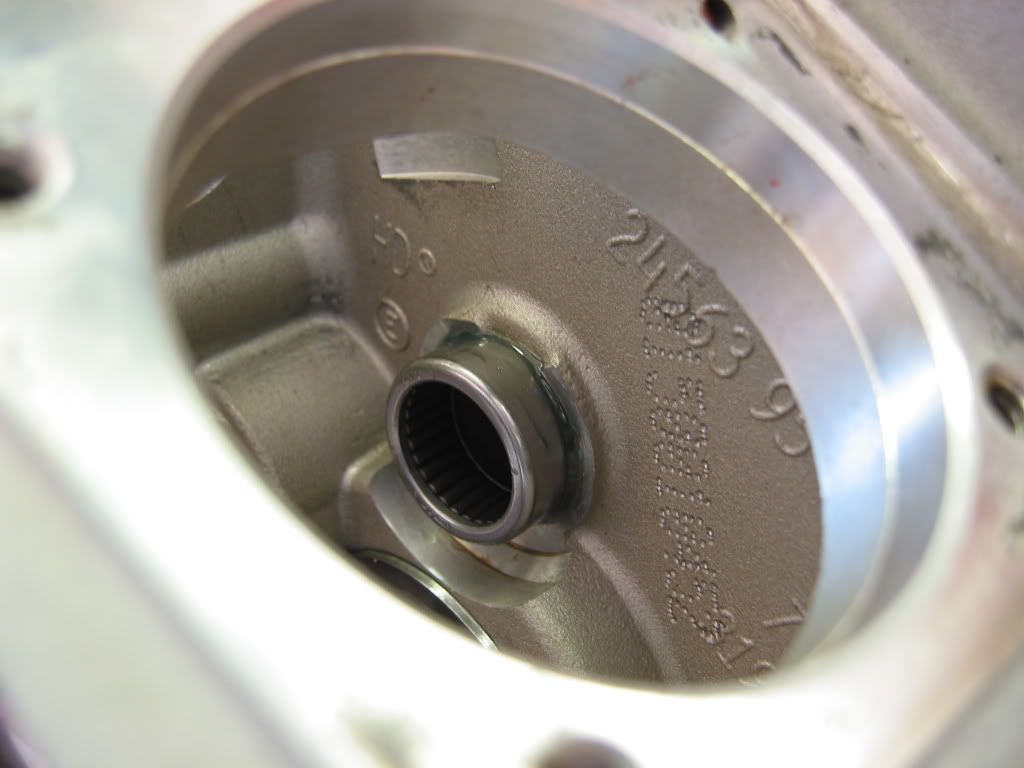
you can BARELY see the lip of the seat when the bearing is in.


after the bearing was set, I put the cam cover back on and checked the camshaft endplay .... this assured me that the bearing was fully seated. My measurement came back eggzactly to what it was prior to removal of the INA bearing ..... .010 inches ..... I was a HAPPY CAMPER   :huepfenjump3:


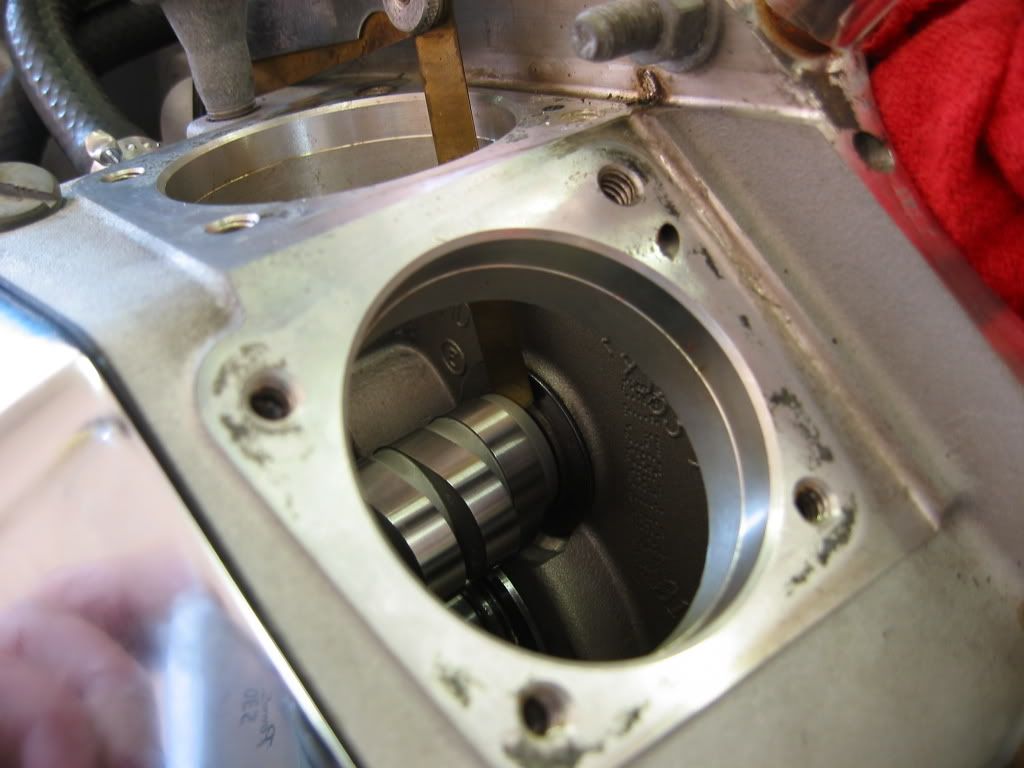
then I removed the cam cover and the gasket, and installed the reed breather valve, EASY EASY, put some assembly lube on it and slide it in the hole, how easy is this stuff !


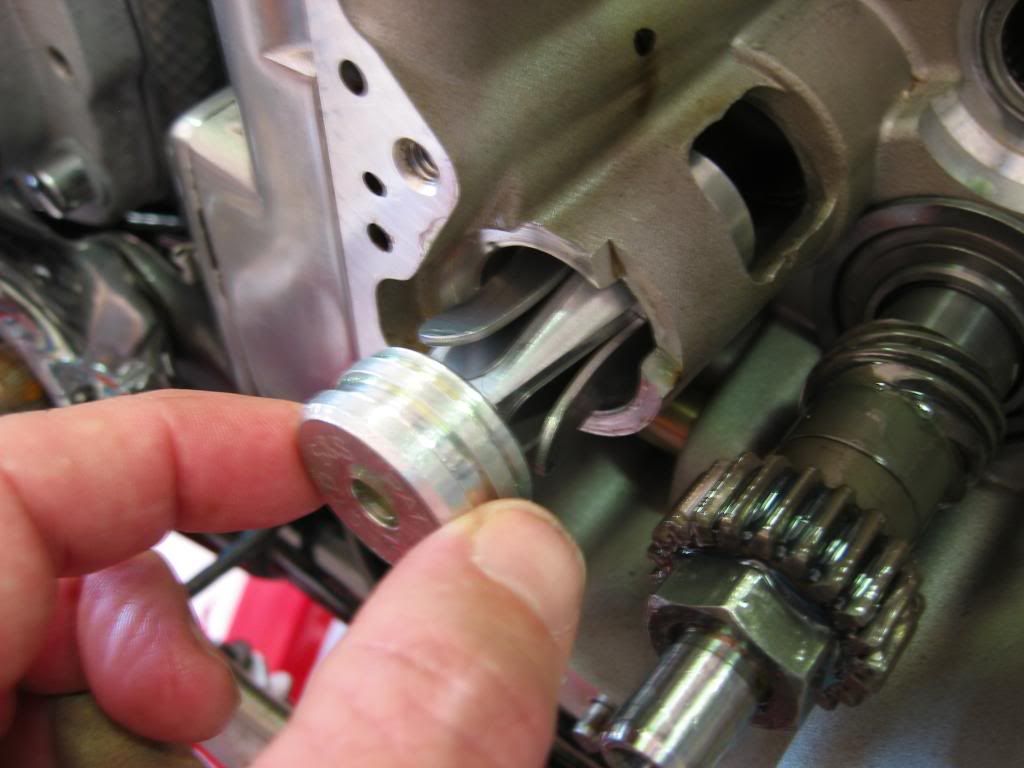
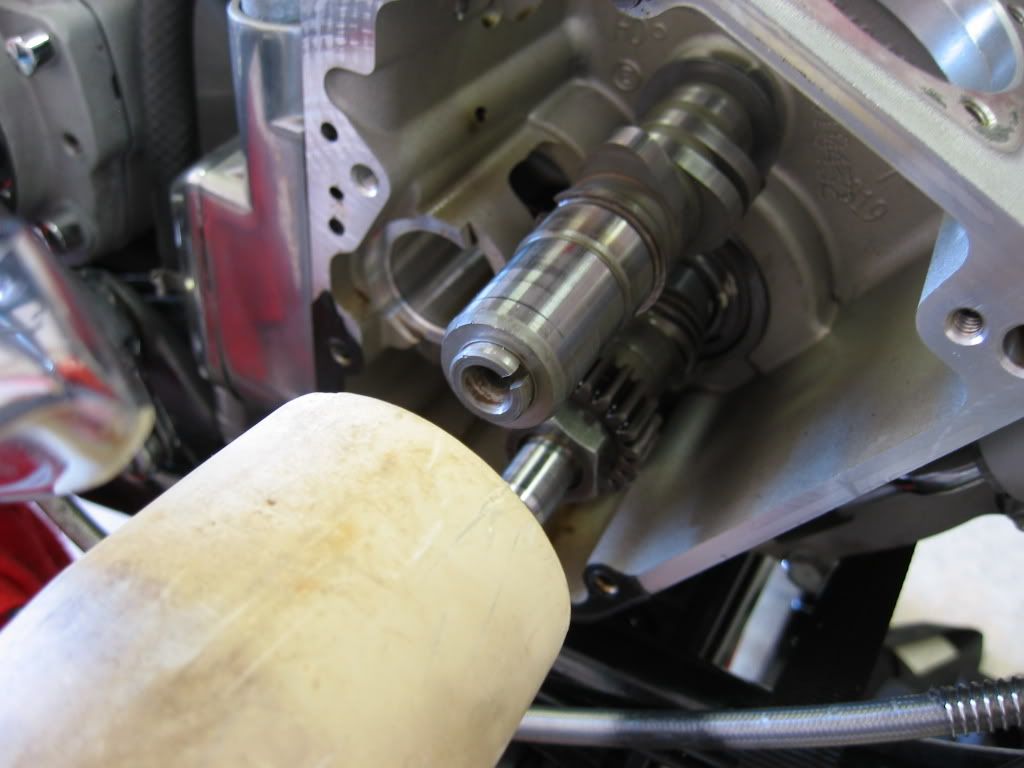
then I installed the camshaft ..... now I have to tell you..... it took me 20 minutes OR MORE to find the dayum timing mark on the pinion gear ... and you MUST have this alignment mark if you EVER think this bike will start again    :huepfenlol2: :huepfenlol2:


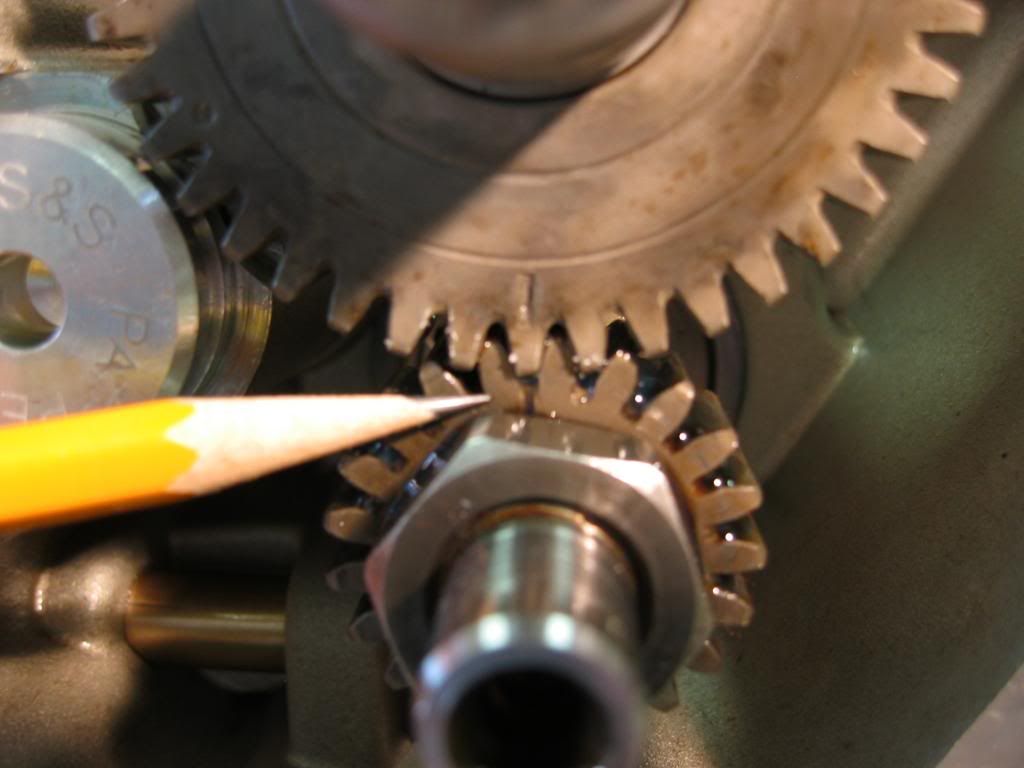
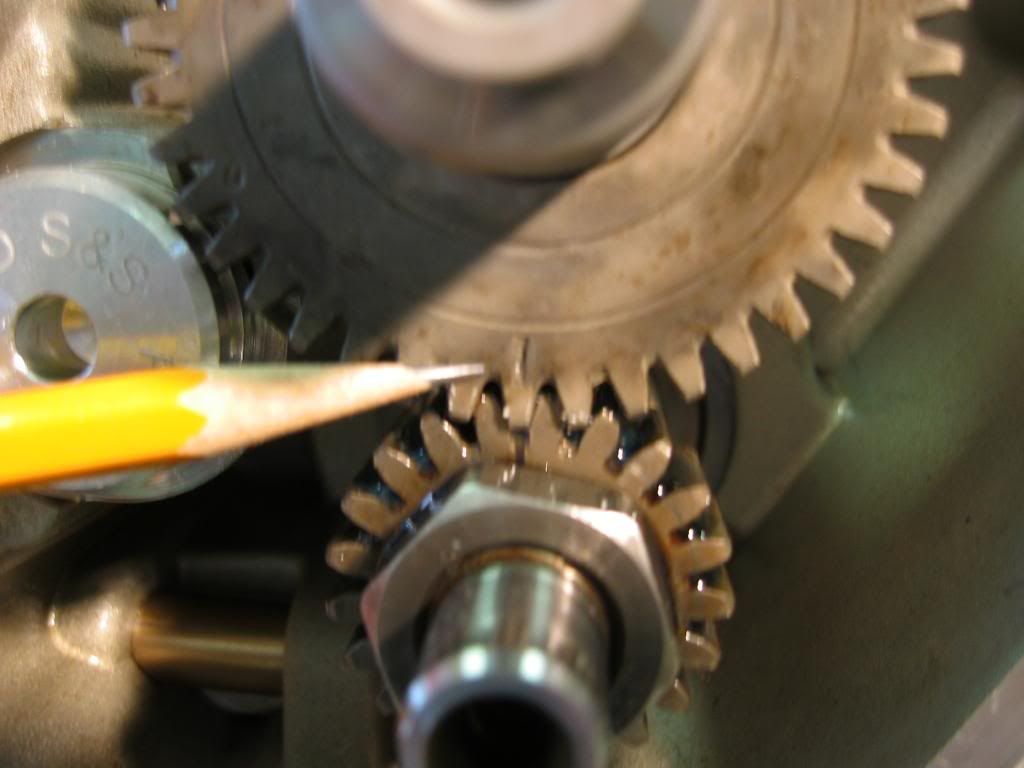
this mark on the left side is for the timing mark if you are using the 'timing dependent' breather valve, which I'm not


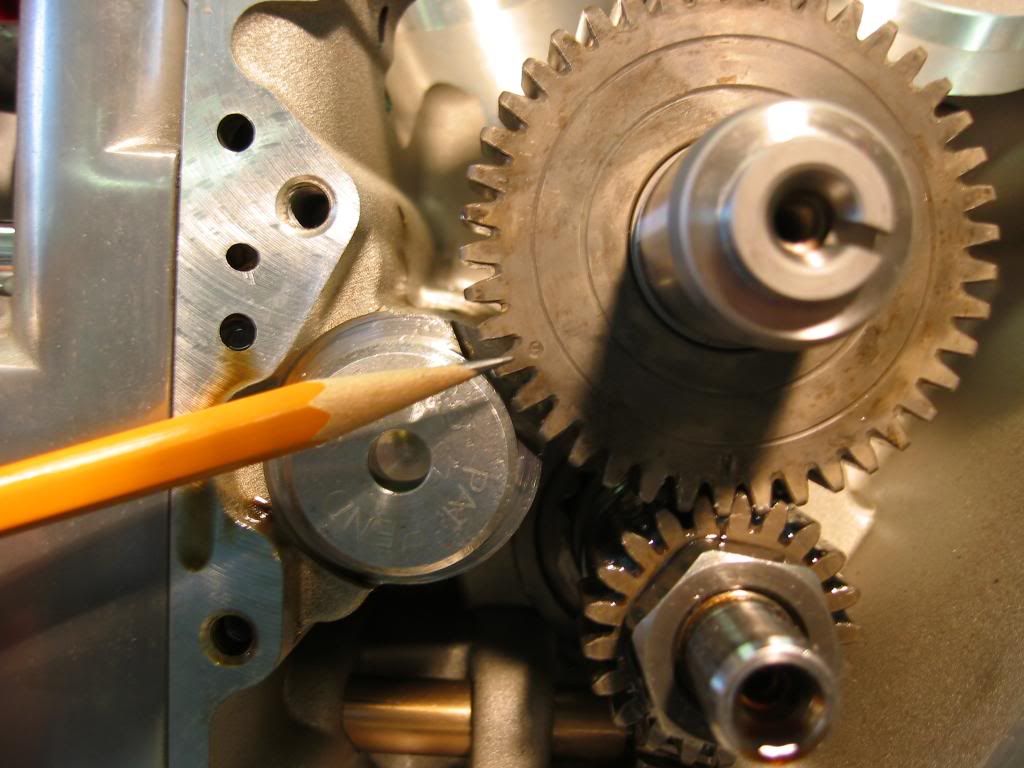
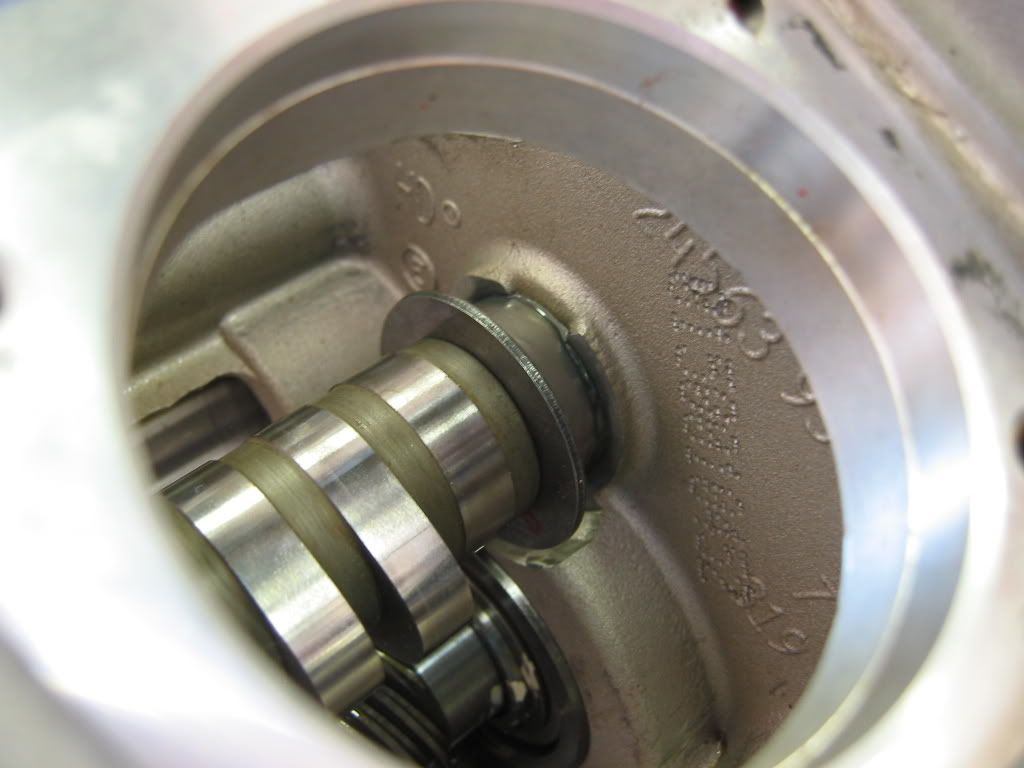
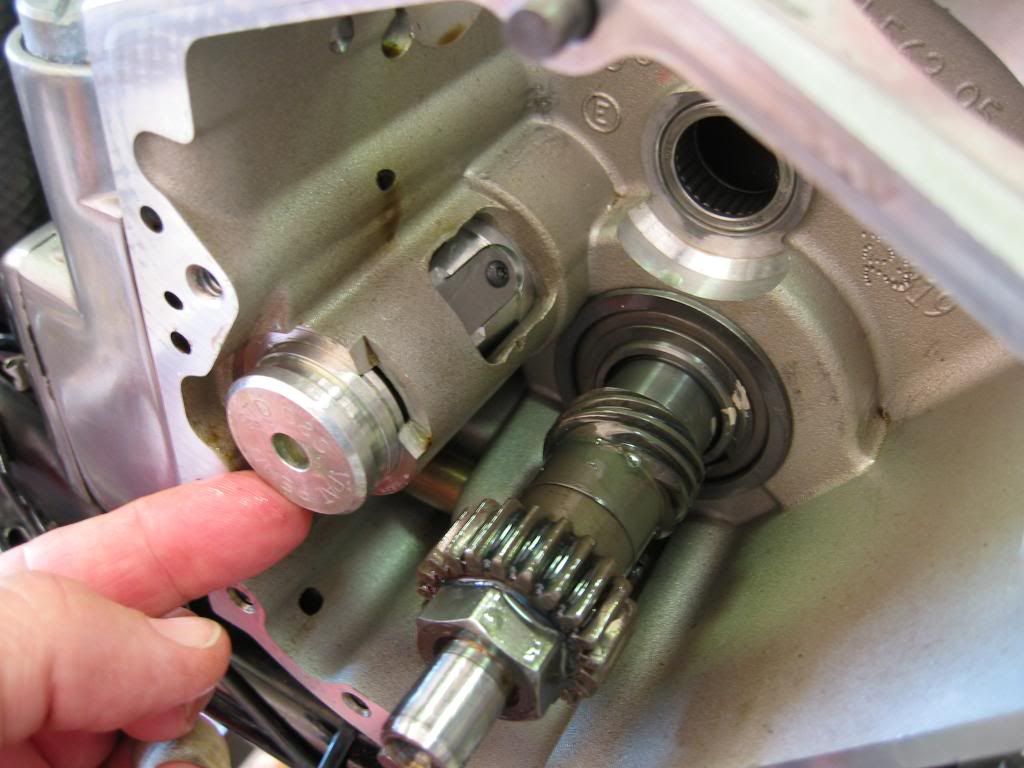
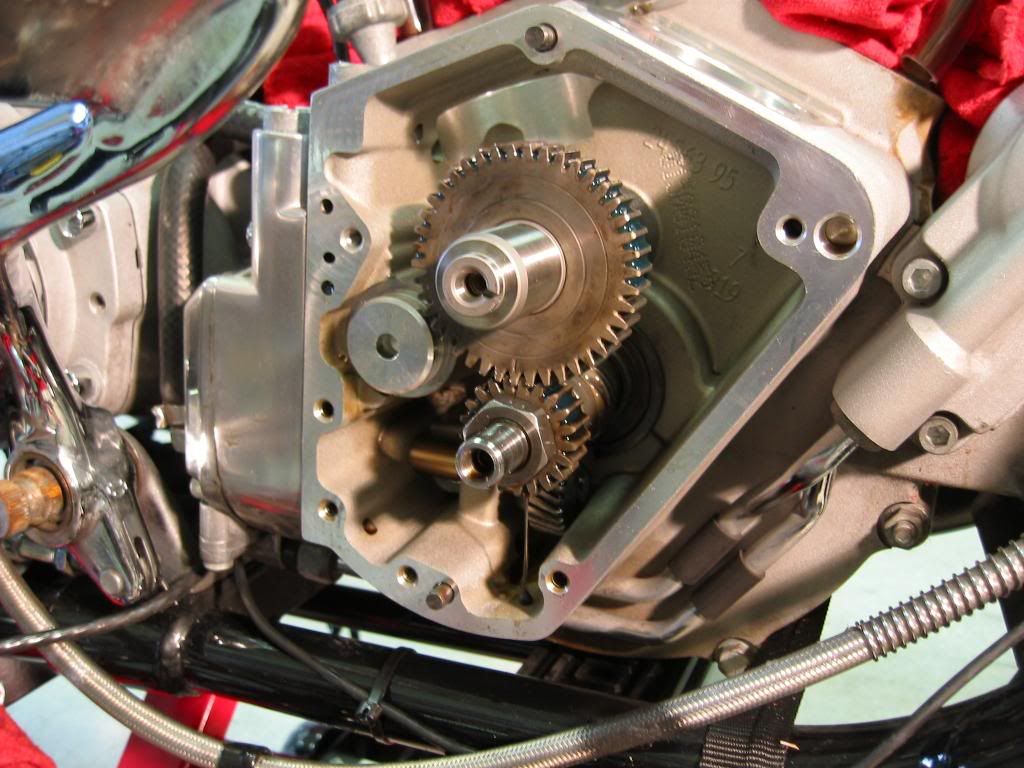
here's the gear chest with the new camshaft, with the orginal cam gear, new torrington bearing and S&S reed valve, all ready to be buttoned up .... dump assembly lube on everything, and then after the cam cover goes on pour 1 pint of clean/new motor oil down through the lifter block hole. This will provide lube to the gears on initial startup before the oil pump gets oil in there.
« Last Edit: February 07, 2009, 07:51:40 PM by fxr4mikey »
Logged
2000 FXR4 Candy Tangerine
The Build -
•   SE Heads w/Cometic .030 gaskets
•   Bob Wood W6 cam
•   Mikuni HSR42 carb
•   Compu-Fire Single Fire Ignition
•   Rivera taper-lite chromolly adjustable push rods
•   Chrome lifter blocks w/HD B lifters
•   Pro-Force One AC and breather kit
•   Vance and Hines straight shots

fxr4mikey

  • Elite CVO Member
  • *****
  • Offline Offline
  • Posts: 742
Re: Mikey's build of his 2000 FXR4
« Reply #173 on: February 07, 2009, 07:47:11 PM »

 
here's some misc pics of the garage while working on the bike .... you might notice the TWO important items on the workbench   :huepfenlol2: :huepfenlol2:


« Last Edit: February 07, 2009, 07:54:57 PM by fxr4mikey »
Logged
2000 FXR4 Candy Tangerine
The Build -
•   SE Heads w/Cometic .030 gaskets
•   Bob Wood W6 cam
•   Mikuni HSR42 carb
•   Compu-Fire Single Fire Ignition
•   Rivera taper-lite chromolly adjustable push rods
•   Chrome lifter blocks w/HD B lifters
•   Pro-Force One AC and breather kit
•   Vance and Hines straight shots

FXR2evo99

  • Elite CVO Member
  • *****
  • Offline Offline
  • Posts: 983
  • LET IT BREATHHHHEEEE BABY LET IT BREATHEEEE
Re: Mikey's build of his 2000 FXR4
« Reply #174 on: February 07, 2009, 11:05:18 PM »

Mikey you took some GREAT photos....feels like I am right there with you helpin you....lol....awesome photos....

About the only thing I could come up with thus far is the following by googling....but I am sure if I had the right description more would come up....

Dirty or corroded bolt threads and nut threads
Dirt or corrosion create friction which produces inaccurate torque reading, resulting in under-tightening bolts to proper spec.

The OEM Service Manual for a TWIN CAM calls for a drop of 20w x 50w motor oil to be applied to the shoulder of the cylinder stud bolt before installing said bolt. I haven't gone this far with my FXR so I am not sure if the OEM Service Manual also calls for the lubricating of the cylinder studs.  Lubricants have different coefficients of friction which can affect the amount of torque needed to achieve the required tension.  Ensure that the toque value is relevant to the lubricant being used....

...and while we are talking about details.....ummm say you are going to use RED loctite has any body actually read the back of the label where it says to wait 24 hours for total "cure"....ummmm seems pretty important...

But Mikey it's ok with all of us if you don't clean your bolts....lol...really....and there are probably are a lot more folks on your side of the "fence" in agreement with you.....but that friction thing above seems pretty important.....shrugs shoulders....


But Mikey really it's ok.....I am still awe struck by your modeling expertise...and to think you could be out there right now in those long johns....it's simply mind boggling...

 :bananarock:
Regards,

Tim

« Last Edit: February 07, 2009, 11:09:27 PM by FXR2evo99 »
Logged

fxr4mikey

  • Elite CVO Member
  • *****
  • Offline Offline
  • Posts: 742
Re: Mikey's build of his 2000 FXR4
« Reply #175 on: February 07, 2009, 11:16:28 PM »

Mikey you took some GREAT photos....feels like I am right there with you helpin you....lol....awesome photos....

~~


Thanks Tim !!!

It'd be SOOOOOOOOOOOOOOOOO KEWL if you were here. ..... however just having some chances to chat with you on the phone about it all is really KEWL too !!

Thanks for your kinds words on the photos !!

I'm trying to follow your lead, you do such an AWESOME job of providing the rest of us with such useful, DETAILED information, I hope I'm adding just a bit to the effort !
Logged
2000 FXR4 Candy Tangerine
The Build -
•   SE Heads w/Cometic .030 gaskets
•   Bob Wood W6 cam
•   Mikuni HSR42 carb
•   Compu-Fire Single Fire Ignition
•   Rivera taper-lite chromolly adjustable push rods
•   Chrome lifter blocks w/HD B lifters
•   Pro-Force One AC and breather kit
•   Vance and Hines straight shots

fxr4mikey

  • Elite CVO Member
  • *****
  • Offline Offline
  • Posts: 742
Re: Mikey's build of his 2000 FXR4
« Reply #176 on: February 07, 2009, 11:27:15 PM »


About the only thing I could come up with thus far is the following by googling....but I am sure if I had the right description more would come up....

Dirty or corroded bolt threads and nut threads
Dirt or corrosion create friction which produces inaccurate torque reading, resulting in under-tightening bolts to proper spec.

VERY interesting, and makes prefect sense to me ........... is it factual, and by HOW MUCH ...... well, we all know that dealers and Indy's don't do this .... so how big a problem might this really be, if any ????


The OEM Service Manual for a TWIN CAM calls for a drop of 20w x 50w motor oil to be applied to the shoulder of the cylinder stud bolt before installing said bolt. I haven't gone this far with my FXR so I am not sure if the OEM Service Manual also calls for the lubricating of the cylinder studs.

Yes, the SM for the FXR calls for you to lube the cylinder bolt, (don't recall that it says the stud) PRIOR to assembly and torquing it down.  It does not specfiy any 'weight' oil, only to dip it in oil and then wipe off the excess.  This allows the head bolt to turn freely on the stud as you torque it down without the interference of friction, dirt, debris and stuff like that there ........

 Lubricants have different coefficients of friction which can affect the amount of torque needed to achieve the required tension.  Ensure that the toque value is relevant to the lubricant being used....
Yep, seems to make sense, but as I said above, the SM doesn't specify any particular 'weight' oil to use, just dip the head bolt into oil and then wipe it off.


...and while we are talking about details.....ummm say you are going to use RED loctite has any body actually read the back of the label where it says to wait 24 hours for total "cure"....ummmm seems pretty important...
I've NEVER read the label  LMFAO ......... and I do not know and ANY place where I'd be using RED loctite ........ am I missing something ?  Can you educate me here ? Thanks !

But Mikey it's ok with all of us if you don't clean your bolts....lol...really....and there are probably are a lot more folks on your side of the "fence" in agreement with you.....but that friction thing above seems pretty important.....shrugs shoulders....
seems, in theory, that it's important, more so than what most people ever give thought to .............  I still doubt that I'll be cleaning my bolts as she goes back together ....
Just another thing to remember .... Torque settings are usually specified in a 'RANGE' ..... so the dirt and junk on the bolt might cause a mis-setting .... but still FALL WITHIN THE RANGE    HUH ???


But Mikey really it's ok.....I am still awe struck by your modeling expertise...and to think you could be out there right now in those long johns....it's simply mind boggling...
OH HELLLLLLLLLLLLLL YESSSSSSSSSSSSSSSSSSSSSSSSSSS  .................  you just don't know whut yur missin' !!!!!!!!!!!!!!!

 :bananarock:
Regards,

Tim

Thanks,!!!!!!!!!!!!!


Logged
2000 FXR4 Candy Tangerine
The Build -
•   SE Heads w/Cometic .030 gaskets
•   Bob Wood W6 cam
•   Mikuni HSR42 carb
•   Compu-Fire Single Fire Ignition
•   Rivera taper-lite chromolly adjustable push rods
•   Chrome lifter blocks w/HD B lifters
•   Pro-Force One AC and breather kit
•   Vance and Hines straight shots

elvislee

  • Guest
Re: Mikey's build of his 2000 FXR4
« Reply #177 on: February 08, 2009, 12:27:24 AM »


As our good buddy Howie says....................YOU GUYS KILL ME!!!!!!      :zroflmao: :zroflmao: :zroflmao: :zroflmao: :zroflmao: :zroflmao: :zroflmao:
Logged

FXR2evo99

  • Elite CVO Member
  • *****
  • Offline Offline
  • Posts: 983
  • LET IT BREATHHHHEEEE BABY LET IT BREATHEEEE
Re: Mikey's build of his 2000 FXR4
« Reply #178 on: February 08, 2009, 10:34:58 AM »

Dirty or corroded bolt threads and nut threads
Dirt or corrosion create friction which produces inaccurate torque reading, resulting in under-tightening bolts to proper spec.

VERY interesting, and makes prefect sense to me ........... is it factual, and by HOW MUCH ...... well, we all know that dealers and Indy's don't do this .... so how big a problem might this really be, if any Yes, the SM for the FXR calls for you to lube the cylinder bolt, (don't recall that it says the stud) PRIOR to assembly and torquing it down.  It does not specfiy any 'weight' oil, only to dip it in oil and then wipe off the excess.  This allows the head bolt to turn freely on the stud as you torque it down without the interference of friction, dirt, debris and stuff like that there ........

1999 FXR2 SERVICE MANUAL Page 3-24

Be sure you thoroughly CLEAN and lubricate the cylinder head bolts before tightening to the correct torque.  FRICTION BECAUSE of dirt or grime will CAUSE the torque wrench readings to be incorrect.  CLEAN and lubricate the threads with engine oil and screw the bolts on the cylinder studs to be sure there is no friction.

Mikey you are "absolutely" right.... :2vrolijk_21: the Service Manual when dealing with everything you are working with in your modification states that 262 Red Loctite is used only on the threads of the pinion shaft gear nut, BUT in your "modification" there is no need to remove it.  LOL but Mikey "technically" I didn't say it was being used in this "Modification"....I said, "say you are going to use......."  meaning whenever such is called for......However I must admit that with my "Modification" of my Twin Cam right now....a drop of Red loctite #262, #271 or #272 is used on both the crankshaft gear/Pinion Gear (31T) bolt inclusive of applying a drop of 20W-50 engine oil under the bolt flange bolt prior to attaching the crankshaft gear/Pinion Gear bolt, as well as following the same procedure for the cam drive gear (62T) bolt.

If any of us know anything about the evo engine.....it's tempermental when coming to base gasket, rocker housing, rocker cover gasket sealing.....thus all of the bolts would fit into the catagory of torque valves being fairly important....I sort of was bringing up the cleaning of the "bolts" as a bit of a anal retentive thing that I do...and wondering if anyone else prescribes to it.....lol....but.....lol the more I think about it the reason given for actually cleaning the cylinder studs from grime (even though the SM doesn't technically mention it....all one has to do is take a dremel tool or some scotch brite to the studs since they are so easily exposed while your pistons and cylinders are removed) as well as the cylinder bolts the more I am inclined to feel that there is more than a justification for my anal retentiveness....Laughing....so my buddy ZN will just have to tolerate my craziness....lol....

But then I wash and dried my rocker covers, rocker housing and actually I washed my cylinder heads before they were shipped out for ccing and "milled" to the level I desired as well....ok so I LIKE TO CLEAN!!! lol.....

Alrighty then I suppose for anyone enough discussion about "bolts"......

Regards,

"Classic"

HERE IS THE PINION SHAFT GEAR NUT

[NOTE: Please remember that putting your cursor next to the paper clip icon below the photo will allow you to enlarge the photo plus save it to your computer if you desire OR if you merely wish to see it enlarged simply put your cursor on the photo and "LEFT" click and it will enlarge]
« Last Edit: February 08, 2009, 01:15:04 PM by FXR2evo99 »
Logged

RedFXR2

  • Guest
Re: Mikey's build of his 2000 FXR4
« Reply #179 on: February 08, 2009, 10:47:17 AM »

Mikey:  Great photo "walk-through" of the process.  Thanks.

About cleaning fastener threads--I've always done that on mechainical projects just because I'm picky that way and it seems like the right thing to do.  Never bothered to search for scientific justification.  Although I do believe that old loctite, sealer, just plain dirt, etc.,  would affect torque values.
Logged
Pages: 1 ... 10 11 [12] 13 14 ... 17
 

Page created in 0.238 seconds with 21 queries.