Please login or register.

Login with username, password and session length
Advanced search  
Pages: 1 ... 12 13 [14] 15 16 17

Author Topic: Mikey's build of his 2000 FXR4  (Read 60095 times)

0 Members and 1 Guest are viewing this topic.

fxr4mikey

  • Elite CVO Member
  • *****
  • Offline Offline
  • Posts: 742
Re: Mikey's build of his 2000 FXR4
« Reply #195 on: February 09, 2009, 10:42:11 PM »

Essentially you are doing the "Joe Mintion" break-in procedure.....and it's a good one....
Mikey I believe in you....... :2vrolijk_21:
Regards,

Tim

do you have a link to this Joe Mintion and his method ?  Thanks
Logged
2000 FXR4 Candy Tangerine
The Build -
•   SE Heads w/Cometic .030 gaskets
•   Bob Wood W6 cam
•   Mikuni HSR42 carb
•   Compu-Fire Single Fire Ignition
•   Rivera taper-lite chromolly adjustable push rods
•   Chrome lifter blocks w/HD B lifters
•   Pro-Force One AC and breather kit
•   Vance and Hines straight shots

fxr4mikey

  • Elite CVO Member
  • *****
  • Offline Offline
  • Posts: 742
Re: Mikey's build of his 2000 FXR4
« Reply #196 on: February 09, 2009, 10:43:44 PM »

My advice....don't use chrome...the chrome will chip and then rust!  Use polished stainless steel....  You can buy "show polish" stainless steel bolt kits on Ebay...

http://cgi.ebay.com/ebaymotors/Stainless-Steel-Engine-Fastener-Kit-for-Harley_W0QQcmdZViewItemQQitemZ330286688122QQptZMotorcyclesQ5fPartsQ5fAccessories

http://stores.ebay.com/STAINLESS-STEEL-CYCLE-HARDWARE

http://cgi.ebay.com/ebaymotors/2006-2009-Harley-Dyna-Polished-Stainless-Allen-Bolt-Kit_W0QQcmdZViewItemQQ_trkparmsZ72Q3a1209Q7c66Q3a2Q7c65Q3a12Q7c39Q3a1Q7c240Q3a1318Q7c301Q3a0Q7c293Q3a1Q7c294Q3a50QQ_trksidZp3286Q2ec0Q2em14QQhashZitem300292544603QQitemZ300292544603QQptZMotorcyclesQ5fPartsQ5fAccessories


Thanks for the links 1!

and Thanks too for the advice on the chrome ones .... and chipping


edit:
well, I went and looked at all three of those listing ..... I didn't see a kit in there for a FXR  .... dynas and flht

I'm sorta like Tim and the bolt thing ..... unless it says FXR, I'm pretty leary of buying it .... been there, early on in my ownership
« Last Edit: February 09, 2009, 10:50:29 PM by fxr4mikey »
Logged
2000 FXR4 Candy Tangerine
The Build -
•   SE Heads w/Cometic .030 gaskets
•   Bob Wood W6 cam
•   Mikuni HSR42 carb
•   Compu-Fire Single Fire Ignition
•   Rivera taper-lite chromolly adjustable push rods
•   Chrome lifter blocks w/HD B lifters
•   Pro-Force One AC and breather kit
•   Vance and Hines straight shots

FXR2evo99

  • Elite CVO Member
  • *****
  • Offline Offline
  • Posts: 983
  • LET IT BREATHHHHEEEE BABY LET IT BREATHEEEE
Re: Mikey's build of his 2000 FXR4
« Reply #197 on: February 10, 2009, 03:04:56 AM »

1999 FXR2 SERVICE MANUAL Page 3-24

Be sure you thoroughly CLEAN and lubricate the cylinder head bolts before tightening to the correct torque.  FRICTION BECAUSE of dirt or grime will CAUSE the torque wrench readings to be incorrect.  CLEAN and lubricate the threads with engine oil and screw the bolts on the cylinder studs to be sure there is no friction.

Same manual, page 3-23, item number 2 at the bottom of the page:
"Be sure the stud holes are clean and dry, place new O-rings on the inserts, and position the head gasket over the inserts."

You didn't add this part of the instructions that preceeded what you typed below.....which is no big deal....but I THOUGHT I would mention that you DON'T use the O~Rings with a COMETIC GASKET.....the COMETIC gaskets are installed without the "O~Rings" just so you know.....if you were going back with OEM Head Gaskets THEN you would INDEED use the "new" O-rings.

"Dip the bottom face of the cylinder head bolts in oil; then wipe off any excess. Place the cylinder head iin position on the cylinder and install the cylinder head bolts finger tight."

So, on one page the say, dip the face of it, on the next page they say 'lube the threads of the head bolt'  which is it ?

If I'm supposed to LUBE the THREADS, how am I supposed to do that ?  and how do I get any excess oil out of there ... you know, if you leave oil behind it can cause a problem with that bolt not going down all the way, because there's no way to displace the oil that is left up in that bolt .....

That's why I would sit down have a few beers, and say do I feel lucky......nahhhhhh seriously what I would do is either acquire new cylinder head bolts (although I am not doing this on my 2002 RKC modification) or I would clean out the bolts the best I could with something like contact cleaner or something that totally evaporates thus allowing them time to dry.......and then before replacing the cylinder jugs back into position on the piston I would thoroughly clean the cylinder stud threads and drop a couple of drops of 20W x 50 motor oil on each stud and call it good.....if you have a air compressor with a air nozzel I would then point the nozzel towards the studs and blow off any excess and if you don't have that....pucker up and blow....then I would next prepare your cylinder jug surface the way it needs to be to receive the new head gasket, after that is accomplished I would position your cylinder jug over the cylinder studs, sitting the jugs firmly in place and then do what it is you are going to do with them to gap your pistons and then I prepare the surface of the jug/cylinder to receive the head gasket, and once the head gasket was set.....I would then place the cylinder head in position.....and then torque accordingly.....

~~

If any of us know anything about the evo engine.....it's tempermental when coming to base gasket, rocker housing, rocker cover gasket sealing.....

Ya know, I'm beginning to think that's not the case at all. After 9 years and 27K miles (which ain't much) the only place I had a leak was on both cylinder, and both of them were the base rocker box gaskets.  From the tear down, I say that it was due to the way they were installed at the factory, couple with a poor gasket design at that time.
I'm of the belief that with today's gaskets, and proper assembly, there won't be any leaks...... but hey, what do I know  ...   
  :nixweiss:  :nixweiss:

But Mikey.....in your effort to "excuse" the "tempermental" nature of the evo leaking issues....you have inadvertently addressed the very reason for why they are "tempermental" ie; the gasket material being a thin type of "paper" material which causes what you are experiencing.....although I must admit two bikes yours and mine that have gasket failures doesn't make it a "statistical" offering for other's future experiences.....but once it happens it's easy to label I suppose....

~~

But then I wash and dried my rocker covers, rocker housing and actually I washed my cylinder heads before they were shipped out for ccing and "milled" to the level I desired as well....ok so I LIKE TO CLEAN!!! lol.....

I will be washing the cylinder bores, all the rocker boxes and lifter blocks before they go back in ....  I'll post up the pretty SHINNY pics too   

LOL alrighty Mikey.....we expect "shinny" pictures.....

Regards,

Tim


« Last Edit: February 10, 2009, 03:24:00 AM by FXR2evo99 »
Logged

FXR2evo99

  • Elite CVO Member
  • *****
  • Offline Offline
  • Posts: 983
  • LET IT BREATHHHHEEEE BABY LET IT BREATHEEEE
Re: Mikey's build of his 2000 FXR4
« Reply #198 on: February 10, 2009, 03:24:56 AM »

".......do you have a link to this Joe Mintion and his method ?  Thanks....."

Actually, Mikey I don't have the link to it....but I have what it stated:

Joe Minton's Break-in procedure taken from a 2003 April American Rider engine break-in article:

Joe Minton, Technical Editor of American Rider Magazine has explained for years that the only part of your HD motor that requires a "break in" is to properly seat the piston rings. His technique is simple and quick. Get on a long straight road that you can do 60mph. Get the bike rolling into 3rd gear at 35mph, roll the throttle wide open without shifting until you reach 60mph, release throttle, return back to 35mph without shifting, again repeat full throttle up to 60mph in third gear without shiffting, release back to 35. Repeat this until you have done it 10 times. All in 3rd gear! You have now seated the piston rings properly. You will not exceed 3,100 rpm doing this.  For the first 500 miles at least, vary your RPM without ever lugging the motor, ever! Keep it over 2,000rpm and vary the rpm range. Stay off cruise control. Do not exceed 3,500rpm constant. Get that oil and filter changed asap!

Hastings Manufacturing – Break-in Procedure

1. Start engine and set throttle to an engine speed of approximately 1200-1750 rpms (25 mph) per hour approximately one minute to assure adequate initial lubrication for piston rings, pistons and cylinders.). Then shut down engine.

2. Ideally, break-in the engine late in the evening when it’s cool and on secondary un-congested roads. In 3rd gear make a test run at 30 miles per hour and accelerate at full throttle to 50 miles per hour. Repeat the acceleration cycle from 30 to 50 miles per hour at least ten times. No further break-in is necessary. If traffic conditions will not permit this procedure, accelerate the engine rapidly several times through the intermediate gears during the check run. The object is to apply a load to the engine for short periods of time and in rapid succession soon after engine warm up. This action thrusts the piston rings against the cylinder wall with increased pressure and results in accelerated ring seating.

3. Drive vehicle normally but avoid sustained high speed during the first 100 miles.

Regards,

Tim
« Last Edit: February 10, 2009, 03:27:30 AM by FXR2evo99 »
Logged

RedFXR2

  • Guest
Re: Mikey's build of his 2000 FXR4
« Reply #199 on: February 10, 2009, 11:00:08 AM »

bout stainless bolts on ebay:  Two of those links are to bolts from Diamond and alloyboltz.  Both have websites from thwich their products can be ordered.  They might have sets specifically for FXR's.  If not, then I would think that one could go to a dealer, or even BikeBandit, get their part number for our primary covers and nosecones and then find those same part numbers on a Dyna or FL series bike (I know that our primary was used on numerous models) and then find a bolt package for that bike.

I've pondered the stainless idea myself.  I've already replaced the rocker box bolts and lifter block bolts with chrome allen heads.  The primary and nosecones (and some others) have hot toppers over the stock zinc-plated bolt heads.   Sort of took away the visual reminder of the need to do something about the bolts.

About rust and fasteners--on the one hand, yes, chrome fasteners (the heads, really) will rust if conditions are right.  It seems to be impossibole to tighten them without fracturiing the chrome plating inside the socket of the head, leading to rust.  But on the other hand, I've found that this rust is quite minimal and easily controlled, even here in Florida.  I wash/rinse the bike off pretty often and dry it--making sure to mop out the fastener heads, or run it afterwards and let heat do the drying.  Occasionally, I use some S100 corrosion preventer on a q-tip and dawb some in the upward-facing (that tend to pool water) bolt heads,  like rocker boxes and lifter blocks.  The bike sits in a garage under a cover so exposure to the elements is minimal.  I have very little or no traces of rust in my chrome bolt heads.  So bottom line is that I don't think the rust issue would be a killer for chrome fasteners or a solid justification for stainless.  Frankly, neither has been a strong enough motivator to actually replace alll of my zinc-plated fasteners with one or the other.  That being said, I would agree that if cost were no issue, and if I did get interested enough to actually buy a new set of visible fasteners, I would prefer the fasteners to be polished stainless.     
Logged

elvislee

  • Guest
Re: Mikey's build of his 2000 FXR4
« Reply #200 on: February 11, 2009, 08:20:18 PM »

Hey Mikey...Where ya been the past couple of days; ya been drinkin more beer than motor building? :nixweiss:  ;D
Logged

fxr4mikey

  • Elite CVO Member
  • *****
  • Offline Offline
  • Posts: 742
Re: Mikey's build of his 2000 FXR4
« Reply #201 on: February 11, 2009, 09:21:35 PM »

Hey Mikey...Where ya been the past couple of days; ya been drinkin more beer than motor building? :nixweiss:  ;D

Yur onto me, aren't ya !!

Well, I got my jugs and pistons back from the indy yesterday.
I have a couple of 'jobs' that I'm working, just for some extra pocket money and 'stuff' for the bike
I've been drinking some beers  .!!!!!

Tonight I put the cam chest together, new chrome lifter blocks and lifters, in ....
cleaned up all the rocker boxes
cleaned up the cylinders and pistons
cleaned up the cases where the lifter blocks go
cleaned 'SOME' of the bolts  ..... gezzzz I can't believe I did that  :confused5:

I'll post pics tomorrow night .... I hope

my hylomar should be delivered tomorrow, according to UPS, so then I can proceed to build up ... next step is to measure the end gap on the rings, if all is well there, put the pistons into the cylinders and install them back in the engine .......   :huepfenlol2: :huepfenlol2:

lots o pics to come .... but, however, I might not get back to it until this weekend, job depending .........  gotaa make 'FUN CASH'    :huepfenlol2: :huepfenlol2: :huepfenlol2:

Thanks for keeping track of my Blanie    :orange:
Logged
2000 FXR4 Candy Tangerine
The Build -
•   SE Heads w/Cometic .030 gaskets
•   Bob Wood W6 cam
•   Mikuni HSR42 carb
•   Compu-Fire Single Fire Ignition
•   Rivera taper-lite chromolly adjustable push rods
•   Chrome lifter blocks w/HD B lifters
•   Pro-Force One AC and breather kit
•   Vance and Hines straight shots

FXR2evo99

  • Elite CVO Member
  • *****
  • Offline Offline
  • Posts: 983
  • LET IT BREATHHHHEEEE BABY LET IT BREATHEEEE
Re: Mikey's build of his 2000 FXR4
« Reply #202 on: February 11, 2009, 11:32:57 PM »

cleaned 'SOME' of the bolts  ..... gezzzz I can't believe I did that    

baby steps....grasshopper, baby steps....

:bananarock:

Tim


Logged

RedFXR2

  • Guest
Re: Mikey's build of his 2000 FXR4
« Reply #203 on: February 12, 2009, 07:21:21 AM »


...cleaned up all the rocker boxes....

If I remember correctly, you had a leak issue at your rocker boxes.  Did you ever check the top plates for flatness?  Now is the time to true them up if they need it.  Place them on a graite countertop or a piece of plate glass and see if they rock at all from corner to diagonally opposite corner.  If they do, they've warped and will need truing.  No biggie, just get some say, 220 grit sandpaper, lay it flat on your countertop and swirl the bottom of the top rocker box cover around in a figure 8 pattern until they don't rock anymore.  This will also remove the chrome on the gasket surface and provide for a more perfect seal.

I did this on mine about five years ago and it's been completely dry ever since.
Logged

fxr4mikey

  • Elite CVO Member
  • *****
  • Offline Offline
  • Posts: 742
Re: Mikey's build of his 2000 FXR4
« Reply #204 on: February 12, 2009, 07:59:32 AM »

need some hlep

putting her back together .....

on the timing rotor ....... I can't find any specs on the torque value for the bolt that holds the rotor in place ..... I looked in the SM....

anyone know of anything ??  or just snug it up 


 :nixweiss: :nixweiss: :nixweiss:


THANKS !!!
Logged
2000 FXR4 Candy Tangerine
The Build -
•   SE Heads w/Cometic .030 gaskets
•   Bob Wood W6 cam
•   Mikuni HSR42 carb
•   Compu-Fire Single Fire Ignition
•   Rivera taper-lite chromolly adjustable push rods
•   Chrome lifter blocks w/HD B lifters
•   Pro-Force One AC and breather kit
•   Vance and Hines straight shots

fxr4mikey

  • Elite CVO Member
  • *****
  • Offline Offline
  • Posts: 742
Re: Mikey's build of his 2000 FXR4
« Reply #205 on: February 12, 2009, 08:24:24 AM »

If I remember correctly, you had a leak issue at your rocker boxes.  Did you ever check the top plates for flatness?  Now is the time to true them up if they need it.  Place them on a graite countertop or a piece of plate glass and see if they rock at all from corner to diagonally opposite corner.  If they do, they've warped and will need truing.  No biggie, just get some say, 220 grit sandpaper, lay it flat on your countertop and swirl the bottom of the top rocker box cover around in a figure 8 pattern until they don't rock anymore.  This will also remove the chrome on the gasket surface and provide for a more perfect seal.

I am taking this advise under serious consideration .....

I did this on mine about five years ago and it's been completely dry ever since.

I did check them yesterday ..... I have a Corian top on my work bench ... not sure exactly how FLAT that is ....
I only checked on of them .....  it is not PERFECTLY flat with the work bench top .... but only off a couple of thousands .... not so much that I didn't think that the gasket wouldn't take it up - that coupled with Hylomar  :nixweiss:  - I've heard that it is a 'wonder' material   :nixweiss:

I will check the other one today ..... following that I'll bring them into the kitchen and ck them on the granite counter top

My leaks (both cyl) were only on the bottom rocker boxes .... I believe the leaks were due to two factors

1) the type and age of the original gaskets

and more than that, it is my belief

2) that the person who installed them in the factory at build time .... DID NOT keep them from moving when they were installed.  If you look at the pictures, you'll see that they really were not where they should have been when the base rocker box was torqued down......

look at these pics ....

here's the front one .... see how the gasket was mushed off to the side..... it got moved during the install and was never really seated where it was supposed to be


here's the rear one ...look in the middle of the pic .... you see where it wasn't where it was supposed to be during the torque down, and therefore .... in my opion was cut during that process...


when the bike was NEW, I took it to a dealer and told them that there was a "FINE MIST" of oil that was coming from 'somewhere'  ..... they couldn't find it, and told me that it was 'dirt and oil' from the highway  BS ....ever since the bike was new my glasses would get misted with oil ..... it's my belief, now that I've seen the bottoms of the rocker boxes, that they leaked from the very first day........ over the years and thousands of miles it finally got bad enough that it was VERY CLEAR that she was leaking.....

I'm VERY CONFIDENT that I will have fixed this problem when she goes back together.  I'll be VERY HAPPY to ride without my glasses getting misted up with oil.  I used to get so frustrated riding and having my glasses fog over with oil, and never being able to find out where it was coming from ......

Logged
2000 FXR4 Candy Tangerine
The Build -
•   SE Heads w/Cometic .030 gaskets
•   Bob Wood W6 cam
•   Mikuni HSR42 carb
•   Compu-Fire Single Fire Ignition
•   Rivera taper-lite chromolly adjustable push rods
•   Chrome lifter blocks w/HD B lifters
•   Pro-Force One AC and breather kit
•   Vance and Hines straight shots

Black Diamond

  • 2.5K CVO Member
  • **
  • Offline Offline
  • Posts: 3363

    • CVO1: 11 FLHXSE2 "Vanessa"
    • CVO2: 08 FLHRSE4 "Lexi" "Bike from Hell"
    • CVO3: 02 FLHRSEI "Ruby"
Re: Mikey's build of his 2000 FXR4
« Reply #206 on: February 12, 2009, 09:40:16 AM »

need some hlep

putting her back together .....

on the timing rotor ....... I can't find any specs on the torque value for the bolt that holds the rotor in place ..... I looked in the SM....

anyone know of anything ??  or just snug it up 


 :nixweiss: :nixweiss: :nixweiss:


THANKS !!!

Checked my 84 SM which states "Rotor bolt 43-48 in-lbs"

JW
Logged

fxr4mikey

  • Elite CVO Member
  • *****
  • Offline Offline
  • Posts: 742
Re: Mikey's build of his 2000 FXR4
« Reply #207 on: February 12, 2009, 11:49:53 AM »

Checked my 84 SM which states "Rotor bolt 43-48 in-lbs"

JW

Thanks JW, I did find it in my manual .. in the ignition section   DUH   :nixweiss:

so it specifies 75-80 inch pounds ..... wow, almost double what your 84 calls for.  .. ..   :nixweiss:

this is one of the few places too that I've come across where it also specifies Loctite 222 (purple) to the rotor bolt    :nixweiss:

won't blue work alright ?

what's the purple, anyone know the diff from blue to purple ??

Logged
2000 FXR4 Candy Tangerine
The Build -
•   SE Heads w/Cometic .030 gaskets
•   Bob Wood W6 cam
•   Mikuni HSR42 carb
•   Compu-Fire Single Fire Ignition
•   Rivera taper-lite chromolly adjustable push rods
•   Chrome lifter blocks w/HD B lifters
•   Pro-Force One AC and breather kit
•   Vance and Hines straight shots

fxr4mikey

  • Elite CVO Member
  • *****
  • Offline Offline
  • Posts: 742
Re: Mikey's build of his 2000 FXR4
« Reply #208 on: February 12, 2009, 10:06:08 PM »

Brown came to my house today ......

I already had the aviation cement, but the Hylomar just came today ..............  :bananarock: :bananarock:
Tomorrow she gets her jugs and heads back   :bananarock: :bananarock: :cucumber: :pepper: :pepper:  hot dayum !!
GIDDY UP

Logged
2000 FXR4 Candy Tangerine
The Build -
•   SE Heads w/Cometic .030 gaskets
•   Bob Wood W6 cam
•   Mikuni HSR42 carb
•   Compu-Fire Single Fire Ignition
•   Rivera taper-lite chromolly adjustable push rods
•   Chrome lifter blocks w/HD B lifters
•   Pro-Force One AC and breather kit
•   Vance and Hines straight shots

fxr4mikey

  • Elite CVO Member
  • *****
  • Offline Offline
  • Posts: 742
Re: Mikey's build of his 2000 FXR4
« Reply #209 on: February 12, 2009, 10:44:43 PM »

Yesterday I did up her bottom end   ::)

most of this stuff is for the 'new guys' that have never done this, but are thinking 'maybe' me too some day ...  so the rest of you just enjoy the pics   LOL

here's my new lifters soaking in an oil bath (20w-50w) ... they been in this bath for about 3 weeks. The reason you do this is that the lifters have to be filled with oil BEFORE you try to adjust them. You can soak them, the oil will flow into the lifters, or you can use a oil squirt can and squirt the oil in there .... I don't have an oil can and didn't want to spend 10 bucks for one just for this job .... find a plastic dish and put them in there.  Be sure to put some saran wrap or something over them ... oil COLLECTS dust and dirt ... you don't want that in your lifters.
you can actually see some of the air bubbles coming up in the oil, you can see my pretty face in there too     :huepfenlol2: :huepfenlol2:


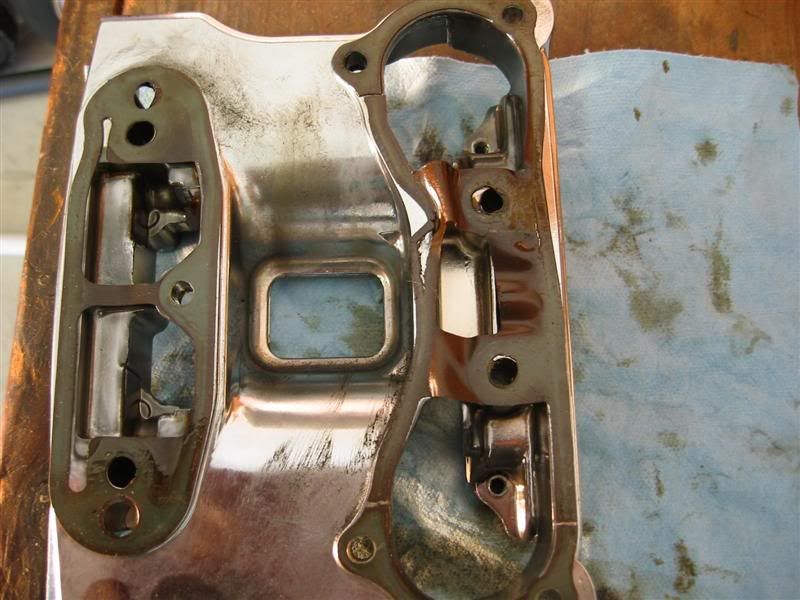
Then I set about to clean off the old gaskets from my rocker boxes. 


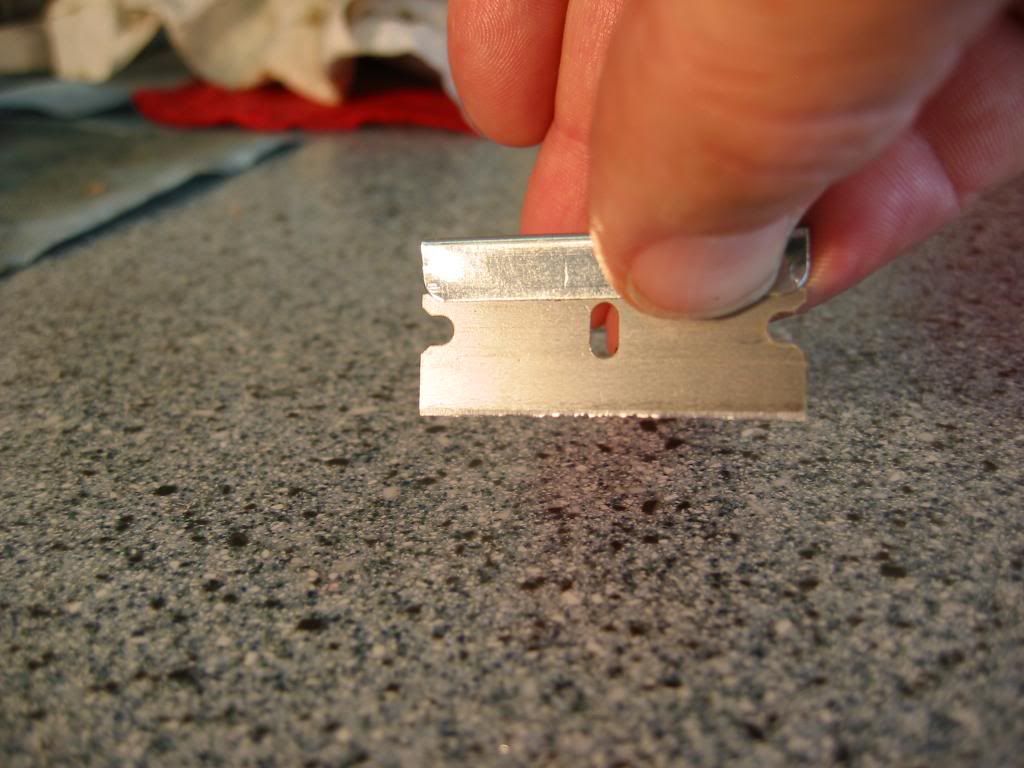
you think that those old paper gaskets aren't 'HARD' / 'TOUGH' ..... look at this razor blade  ... it's was NEW when I started


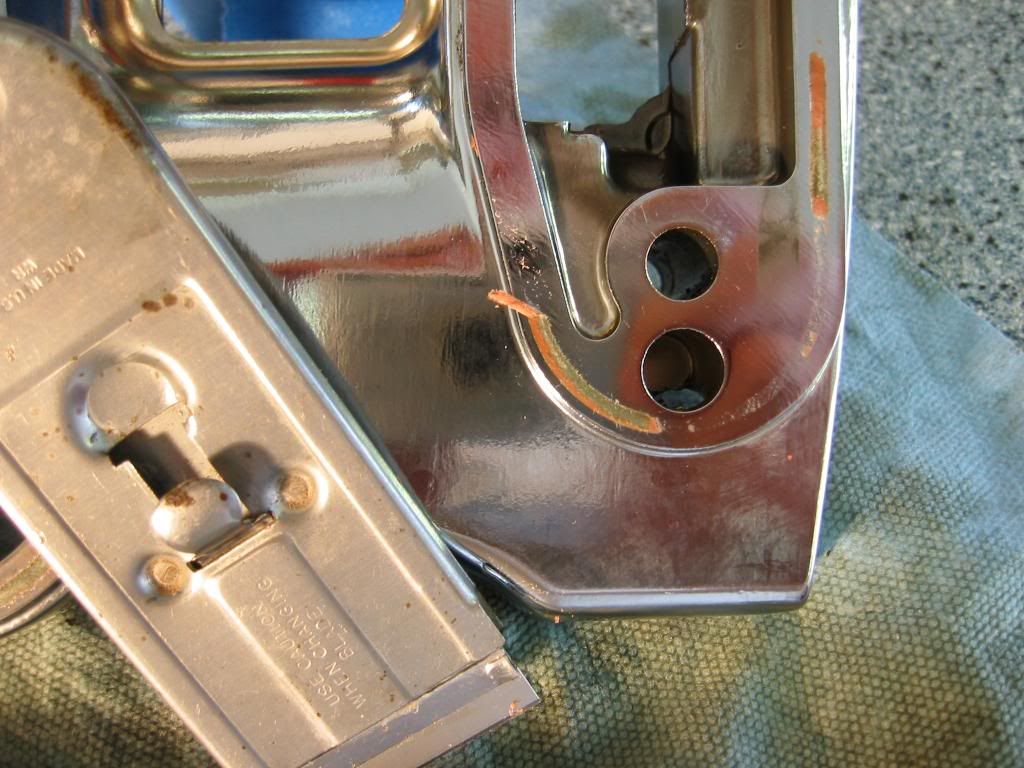
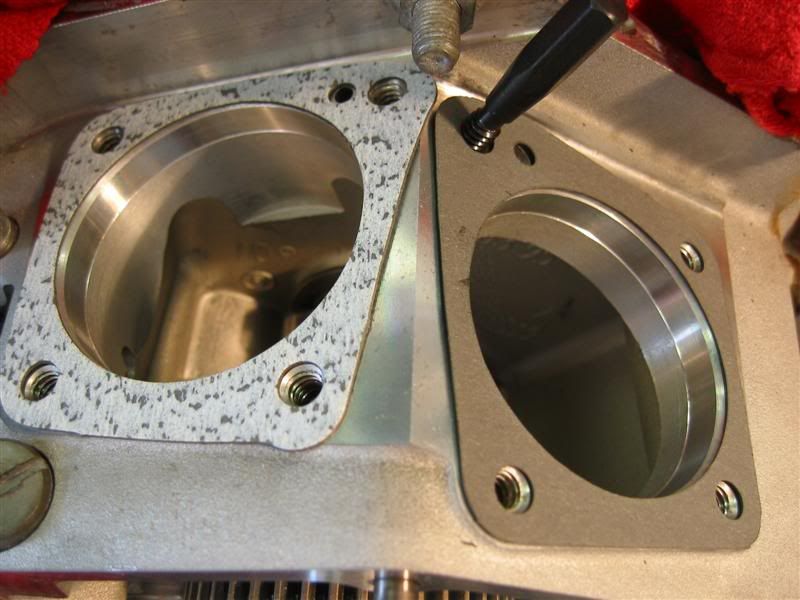
then I set about to clean up the cases where the lifter blocks mount .. some of you should be HAPPY now   LMFAO  !!!!!!!


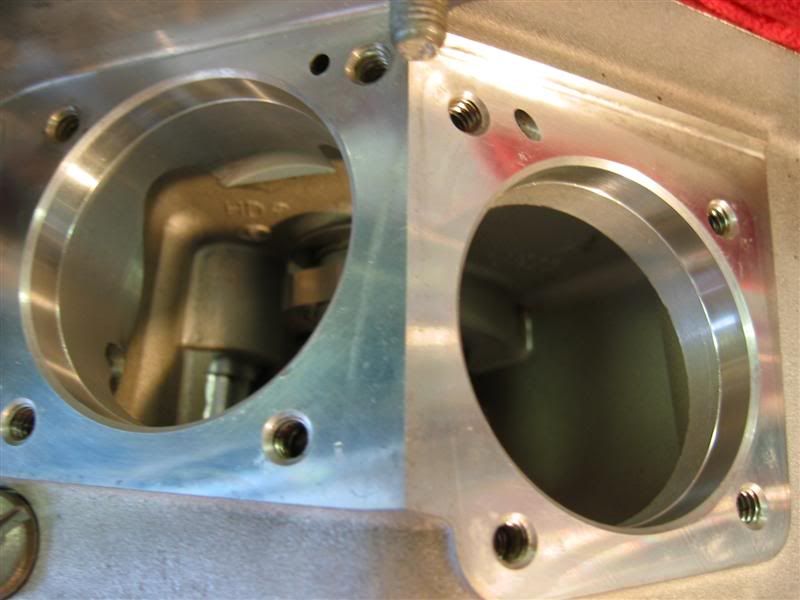
then I set about to install the lifter blocks and lifters
Here you see the block gaskets ... HD stuff, one is silver, one is gray, you CAN NOT mix them up, the silver one goes on the rear cylinder, SIMPLE is as SIMPLE does   LOL

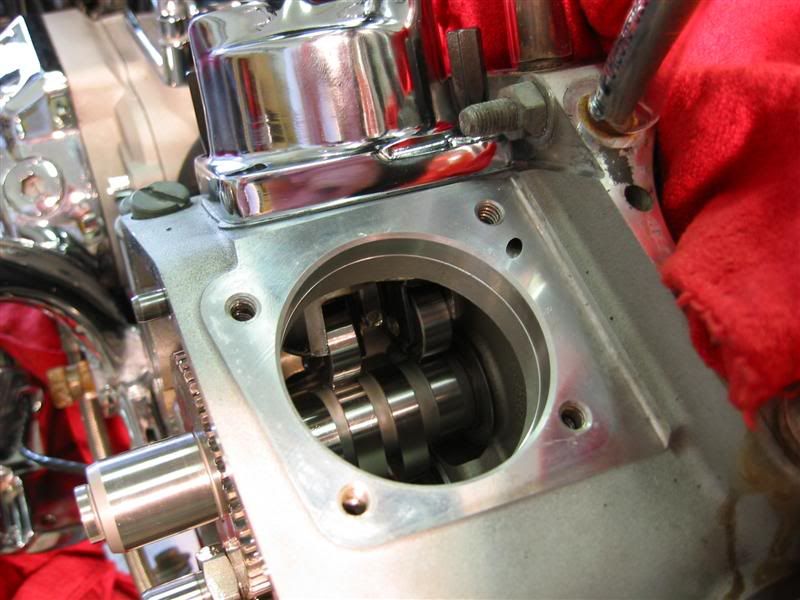
for those of you who might not know, you have to use an ALIGNMENT tool when you install the lifters. This insures that the oil passage in the cases are aligned with the holes in the lifter blocks, and more so, that the lifters are aligned properly with the lobes on the cam shaft.
In the above picture you can see the little black alignment tool, it is in this picture only to hold the gasket in place while I was taking the picture.
The way you do it .... put the gasket on the bottom of the lifter block, install the lifters and blocks onto the case, install the alignment tool in the hole next to the oil passage (I use two alignment tools .. in opposite corners) then install the two bolts, torque them down, remove the tools, insert the last two bolts and torque them down


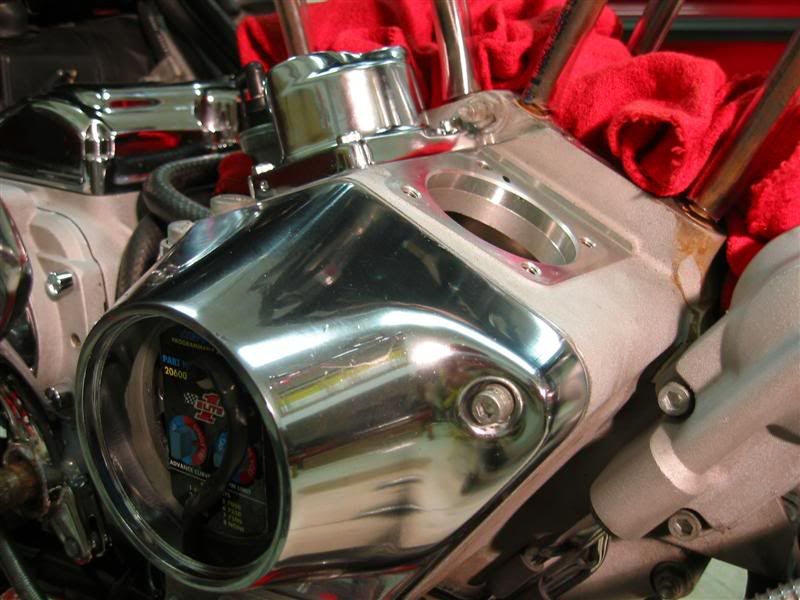
first lifter block installed ..... CHROME !!!!!!!!!!!!!!!!!!   :pepper: :pepper:  GOES FASTER !!!!!!!!!!!

I did it this way so I could put my fingers in the cam chest to hold the lifters in the blocks while I lowered onto the case.  On the second one I just bent a paper clip and hooked it onto the retaining ring lip and pulled the lifters up against the top of the block while I lowered it onto the case ..... didn't want to drop one of them into the cam chest.  I closed up the cam chest before I installed the second lifter block because I used that hole to dump 1/4 pint of oil into the cam chest

putting the oil in ... used a funnel because I had the oil in a dish that the lifters were soaking in


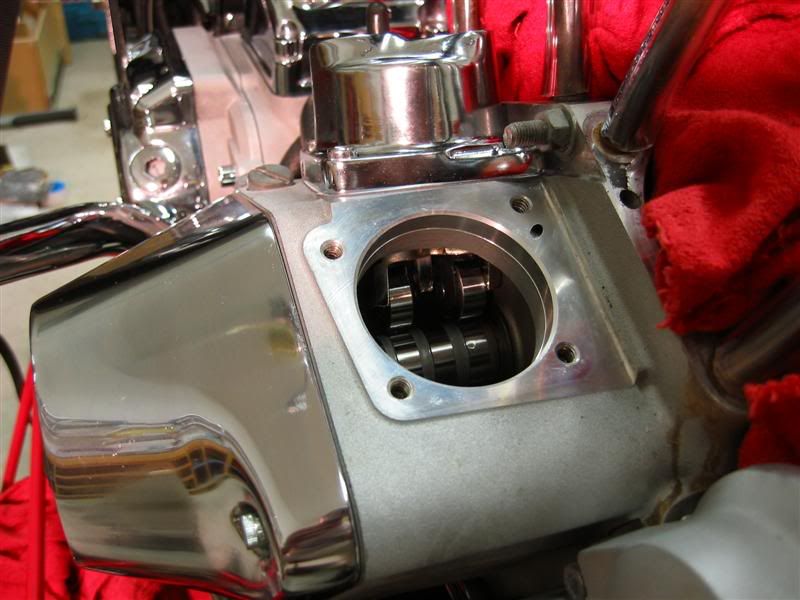
putting on the second lifter block... you can see the alignment tool on the lower left of the block .... nice torque wrench huh   :pepper: :pepper:


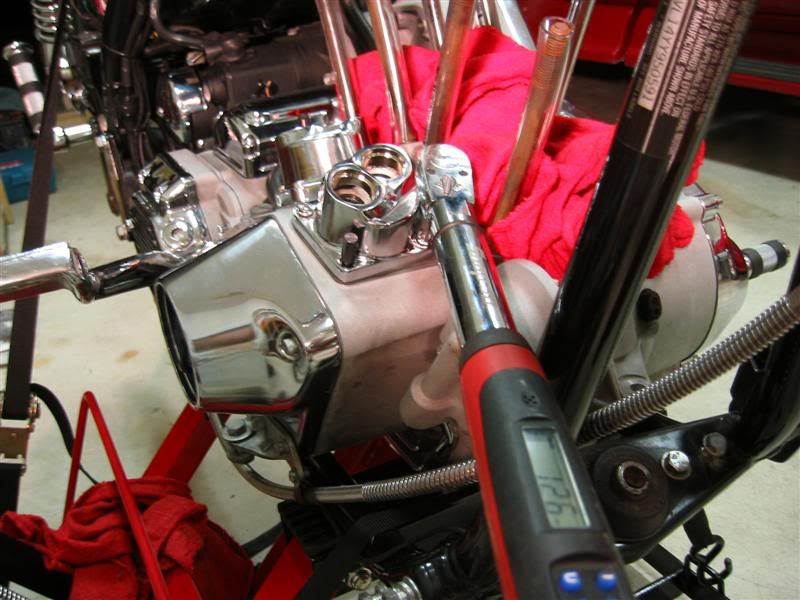
both sets of lifters installed - cam and breather valve installed


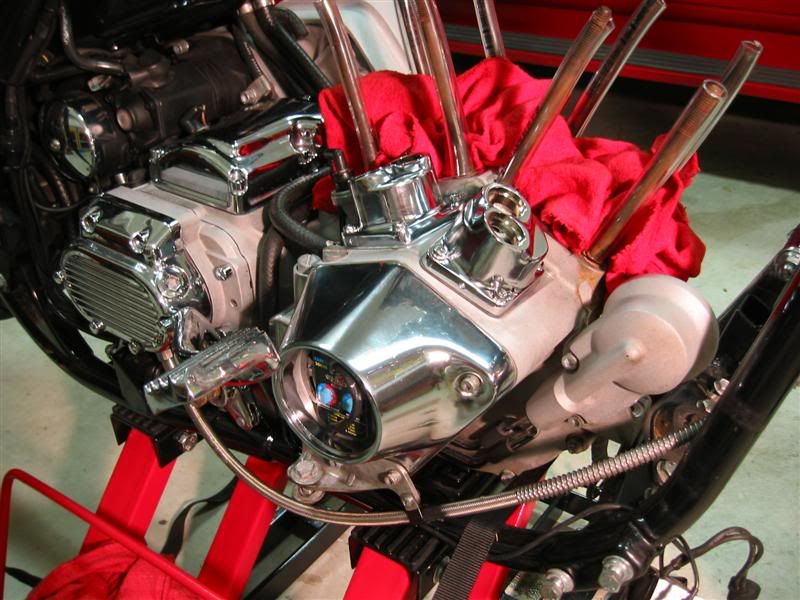
Tomorrow, or the next day, when I post up pics you'll see why I did it this way ....
I want to clean up my cylinder studs (YEAH YEAH YEAH ...... I KNOW, I KNOW  :huepfenlol2: :huepfenlol2: :huepfenlol2: )  and I wanted to  close up the cam chest and cover the lifters cause I don't want any of the debris from that job to get inside .....


« Last Edit: February 12, 2009, 10:52:55 PM by fxr4mikey »
Logged
2000 FXR4 Candy Tangerine
The Build -
•   SE Heads w/Cometic .030 gaskets
•   Bob Wood W6 cam
•   Mikuni HSR42 carb
•   Compu-Fire Single Fire Ignition
•   Rivera taper-lite chromolly adjustable push rods
•   Chrome lifter blocks w/HD B lifters
•   Pro-Force One AC and breather kit
•   Vance and Hines straight shots
Pages: 1 ... 12 13 [14] 15 16 17
 

Page created in 0.242 seconds with 21 queries.