Please login or register.

Login with username, password and session length
Advanced search  
Pages: [1] 2  All

Author Topic: Boom Audio Music and Intercom Kit--77108-09--CB Solution for Non-CB CVOS et al.  (Read 17226 times)

0 Members and 1 Guest are viewing this topic.

Harleypingman

  • 1K CVO Member
  • *
  • Offline Offline
  • Posts: 1101

The better title for this thread wouldn't fit:  "BOOM! Audio and Music Intercom Kit--P/N 77108-09--Superb CB/Intercom Solution for Non-OEM CB equipped CVO Fairing Models, 2004-2010."  The virtues of this kit are:  (1)  allows installation of CB/Intercom without replacing the tank console; and, (2) provides passenger headset connector and passenger control without a tour pak/speaker pods.  For those intested in a CB/Intecom on their fairing model CVO's, this kit may do the trick.

Previously, installing a CB/Intercom on a non-CB equipped, '06 or newer fairing model bike typically required replacement of the tank console.  Indeed, HD's product description for the CB module, p/n 76416-06C, provides the requirement for some fairing models.  Because the BAMI kit provides a headset connector that doesn't use the tank console, the OEM tank console is retained, unaltered.  Here's picture of the headset connection on my bike:

http://i82.photobucket.com/albums/j260/harleypingman/BAMI%20Kit%20Installation/HKBAMIinstall023.jpg[/img]]
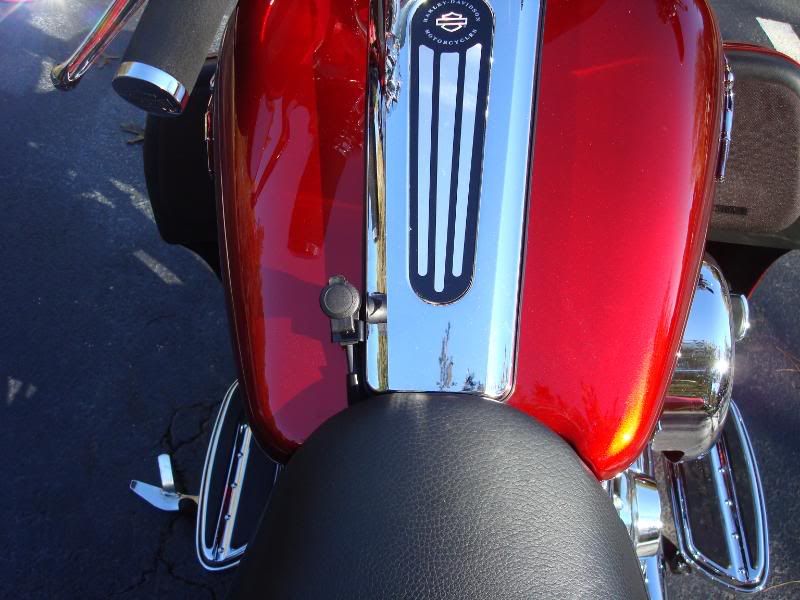
NOTE:  See reply #7 below for a clever alternative to mounting the rider headset connector on the gas tank. 

Instead of putting the passenger controls on speaker pods, the kit provides the PTT/vol. switch on the passenger headset connector stalk pictured here:

http://i82.photobucket.com/albums/j260/harleypingman/BAMI%20Kit%20Installation/HKBAMIinstall024.jpg[/img]]

The BAMI kit does not provide passenger control of the audio mode that is found on Ultra models.

The primary components in the kit are:  (1) three harnesses for the rider headset connector, passenger headset connector, and passenger PTT/vol.; (2) assembled left handlebar switches/black switch housings/harness; and, (3) fairing cap "Speaker" switch.

Additional parts needed for installation/operation are:  (1) non-Ultra overlay harness, p/n 70169-06; (2) CB module 76416-06C; an antenna (I used the new J&M in-fairing CB antenna); and, headset/mic (I used J&M Elite series headset and Z lower cord).

The installation instructions are included in the kit description on HD's website:

http://www.harley-davidson.com/gma/gma_product.jsp?PRODUCT%3C%3Eprd_id=845524448774053&FOLDER%3C%3Efolder_id=2534374302491575&ASSORTMENT%3C%3East_id=2534374302491575&bmUID=1257563524796&bmLocale=en_US

Although HD's website lists fitment information as '07 and newer models, the instructions surprisingly refer to installation on '06 FLHX, FLTR, and FLHT/C models.  Speculating, the only obvious reason HD doesn't list the kit's fitment for '06  model year bikes is the handlebar switch harness supplied uses a Molex connector to connect to the interconnect harness, while '06 (and older models models) use a Deutsch connector which is not compatible with the Molex connector used by the interconnect harness.  To install the kit on a pre-'07 bike, the wires must be removed from the Molex connector and the clutch interlock switch put aside, the Molex wire terminials cut-off (since they are not compatible with the Deutsch connector),  new Duetsch terminal sockets attached, and the Deutsch connector reassembled.  A new Deutsch connector can be purchased, but I simply used the one from my bike after I removed the OEM wires from it.  The parts required for this change are listed in the third post of this thread.  

Since the lefthand switches come pre-installed in the black switch housing, most will want to remove them from the black housing and reinstall them in chrome housings.  A new lower chrome housing will need to be purchased to accommodate the addition of the PTT/squelch switch; the OEM upper housing is reused.  The black audio and PTT switch caps need to be removed from the lower housing in order to remove these switches from the black lower housing.  Pulling the switch caps while wiggling them back and forth very slightly works fine.  HD includes a small, tuning fork-type plastic tool to pry them off in their chrome switch cap kits so something similar to it will work, also.  If you already have chrome switch caps, you will need to buy the chrome PTT
cap and a new Audio switch cap as the one used with a PTT cap next to it is smaller than the one used with no PTT switch present.  These switch caps are sold separately.

A magnetic tipped Philips screwdriver is great for removing and reinstalling the small screws that secure the metal brackets inside the housings.  Also, a tech at my dealership gave me an excellent tip for reaching the screw that secures the metal plate over the Audio and PTT switches in the lower housing.  The conduit covering the wires is secured with a thin zip tie to that metal plate making access to one of the screws difficult.  He suggested cutting the zip tie and pulling the conduit back 6 or so inches to provide much easier access to the screw.  The tip worked great when removing the switches and, again, when reinstalling the switches in the chrome lower housing.  The conduit can be easily pushed back over the wires and secured with a new zip tie when reassembling the lower housing.

The switches HD uses for the Audio and PTT functions appear to be identical except for the wire colors in them and those wire colors readily identify the switch's function.  To avoid confusion when reassembling, marking the Audio and PTT switches, as well as identifying the tops or bottoms of the switches is helpful.  

(The thread continues in the next post.)


« Last Edit: May 10, 2011, 11:34:03 AM by Harleypingman »
Logged

Harleypingman

  • 1K CVO Member
  • *
  • Offline Offline
  • Posts: 1101
BAMI kit installation cont'd
« Reply #1 on: November 01, 2009, 03:33:03 PM »

The kit comes with zip ties, primarily for use in securing the three wiring harnesses mentioned previously (rider headset connector, etc.) along the channels under the gas tank on '06 and newer bikes.  Additional zip ties in a couple of sizes are handy.  The overlay harness is exceptionally large in diameter and can be secured to the interconnect harness (the large harness in convoluted tubing in front of the speedo and tach above the HK head unit) using a couple of good sized zip ties.  Also, there will be some excess harness length inside the fairing, so small zip ties are useful in securing them out of the way.

Here's a picture of the inner fairing with the overlay harness, new handlebar switch harness, CB module, rider headset connector, passenger headset, and passenger PTT/vol. switch installed.  All but the handlebar switch harness connect to the overlay harness which is most easily recognized because the 35 wire connector plugged into the back of the HK head unit is a major part of the overlay harness and clearly visible in the picture:

http://i82.photobucket.com/albums/j260/harleypingman/BAMI%20Kit%20Installation/HKBAMIinstall020.jpg[/img]]

On the left side of the picture, you can see white clips along the outer edge of the inner fairing.  These are plastic clips that secure the J&M CB antenna.  You can make out the J&M antenna box with the CB antenna cable going to the CB module atop the HK head unit.  There is an additonal CB cable coming from the J&M box for connecting to an OEM CB cable; a useful feature for those with a rear mounted CB antenna who may remove that antenna from the bike (i.e. detachable tour pak).  Although the picture shows the CB module on the right side of the head unit, it was relocated to the left side before the outer fairing was reinstalled.  The bundled cable above the head unit is an in-fairing antenna that works quite well, but is intended for automotive use.  Prior to adding this huge amount of  wiring inside the fairing, that "bundle" never phased me; but, now I think it's time to address it as it's awfully crowded in there and there's no reason to have excess wiring.

Suffice it to say that the overlay harness and the harnesses that connect to it take up a lot of space and must be routed carefully to permit easy (or at least relatively easy) reinstallation of the outer fairing.

A couple of final points.  The rider headset connector sits on thick, double-sided tape which should avoid damage to the gas tank.  Atop it is more thick, double-sided tape and a coated metal bracket over the connector is secured by the tank console.  The bracket fits between the console and the rubber gasket, again, to avoid damage to the gas tank.  That connector isn't going anywhere.  

The only dealer action necessary for this kit to be fully functional is a Digital Technician download to activate the Intercom feature.  No DT download is necessary for the CB.  The charge was $50.

[The next post deals with modifications necessary for installation on an '04 or '05 model, but that must wait 'till tomorrow; it's late.  I'll edit this and the previous post to supply part nos.]

« Last Edit: August 05, 2010, 07:16:04 PM by Harleypingman »
Logged

Harleypingman

  • 1K CVO Member
  • *
  • Offline Offline
  • Posts: 1101
Harman Kardon and BAMI installation
« Reply #2 on: November 01, 2009, 03:35:06 PM »

Although my installation was on an '04 EG, not an FLHTSCE or 2, the main harnesses and interconnect harnesses are common to all models, though the CVO models have an audio harness not found on the non-CVO EG.  The only modifications I made were to the interconnect harness:  (1) splice a wire from the Base Radio Connector to retain the Automatic Volume Control of the HK head unit; and, (2) replace the three-wire Deutsch audio connector with a six-wire Deutsch connector and splice two wires to replicate the wiring of the '06 interconnect harness for use of the HK head unit.

The AVC for the HK head unit gets vehicle speed information from the serial data wire that is found in slot 2 of the speedo.  On pre-'06 bikes, the Radio Sound radio gets vehicle speed information from the Vehicle Speed Sensor via a white/green stripe wire in pin out #9.  Simply sever the white/green wire (to separate it from the OEM interconnect harness) and connect the end from the Base Radio Connector (BRC) to the Light Green/Violet wire, the serial data wire, in slot 2 of the speedo connector.  Here's a picture of the two prior to splicing;  I severed the white/green wire relatively far from the BRC to shorten the spliced wire's length by simply opening the wire loom (cut a zip tie or two and remove some tape from the bundled wires):

http://i82.photobucket.com/albums/j260/harleypingman/BAMI%20Kit%20Installation/HKInstall001-1.jpg[/img]]

The white/green wire's exposed conductor is visible in the upper left, and the LGn/V wire's exposed connector is visible in the lower right at the connector with the green seal.

The three-wire Deutsch audio connector on the OEM interconnect harness is replaced with a six-wire Duetsch connector to duplicate the '06 audio connector.  This modification is necessary because the non-Ultra overlay harness uses a six-wire Deutsch connector to connect it to the bike's interconnect harness.  Here are pictures of the two connectors and related parts:

http://i82.photobucket.com/albums/j260/harleypingman/BAMI%20Kit%20Installation/HKCBinstall002.jpg[/img]]

http://i82.photobucket.com/albums/j260/harleypingman/BAMI%20Kit%20Installation/HKCBinstall003-1.jpg[/img]]

The part nos. are:  (1) Deutsch connector, 72116-04, socket lock, 75156-04; terminal socket, 72191-94 (qty. 2); seal pin 73195-94 (qty 2).
Disassemble the three-wire connector per the directions in the HD Service Manual.  The V/Gy and Be/Y wires are used; the O/V is not.  

Splice/tap two wires from the BRC:  (1) R/O from pin out #10 of the BRC; and, (2) Bk/Gn from pin out #11.  Add the terminal sockets to the splices and assemble the six-wire Deutch connector as follows:  slot 1--V/Gy, slot 2--Be/Y, slot 3--R/O, and slot 6--Bk/Gn; slots 4 and 6 get the seal pins since they aren't used.  The Deutsch connector as assembled is connected to the "interconnect" labeled connector on the overlay harness.

Other than these modifications, the installation of the HK head unit and BAMI are the same (with the previously described swap of the Molex connector for the Deutsch connector on the left handlebar harness).

Happy to report that everything works as intended.  PM me if you need any additional information.

« Last Edit: August 05, 2010, 07:22:40 PM by Harleypingman »
Logged

NativTexan

  • Junior CVO Member
  • **
  • Offline Offline
  • Posts: 95

Is there a boom audio kit that is cheaper that does not include the passenger connectivitiy?  I am just looking to add the CB for myself.
Logged
2011 Black Diamond/Crimson FLXSE2
Allen, Texas

Harleypingman

  • 1K CVO Member
  • *
  • Offline Offline
  • Posts: 1101

Is there a boom audio kit that is cheaper that does not include the passenger connectivitiy?  I am just looking to add the CB for myself.

There isn't (at least in the HD catalogs I've seen) a "rider only" BAMI kit.  However, if you look at the installation instructions for the 77108-09 BAMI kit in my original post, you can read them to understand what's required for "rider only" CB, and identify the parts in the parts listed at the end of the instructions for your "rider only" application and buy only those parts from HD.  Said another way, price out/buy what's in the BAMI kit EXCEPT for the parts that are for the passenger.

Good luck with your project.

Carl   
Logged

NativTexan

  • Junior CVO Member
  • **
  • Offline Offline
  • Posts: 95

Thanks for the help.  Still working on the parts list.  Damn, this is an expensive hobby!
Logged
2011 Black Diamond/Crimson FLXSE2
Allen, Texas

Harleypingman

  • 1K CVO Member
  • *
  • Offline Offline
  • Posts: 1101

Glad to help.  Good luck with your project. 

Carl
Logged

VRODDAVE

  • Senior CVO Member
  • ****
  • Offline Offline
  • Posts: 405
  • Semper fi 73-77

    • CVO1: 2018 FLHTKSE ANV
    • CVO2: 2004 FLHTCSE - Crashed 7/31/2015. May she rest in pease
    • CVO3: 2003 VROD - sold

I have completed this install detailed by Harleypingman.   It works great.

I was fortunate enough to already own the CB, XM, navigaition,modules aready installed in the advanced radio unit i picked up on ebay.  I have always wanted this intercom and CB soultion to work on my bike, but was not sure how to make it happen.   This kit, along with some great instructions by harleypingman did the trick.   

just a few things to share,

I have observed that when the speaker switch is in the lighted position, radio does not retain memeory of where it was last. Example:  you are listening to CD, and turn off the key switch.  when you turn it back on, it will revert to somthing other than CD, such as radio.   with the speaker switch in the middle position, this does not happen.

I think this is a bug of the advanced radio, and not this install as my buddy with FLHTCUSE 06 can replicate the issue.

the part numbers for the interconnect plug that harleypingman gives,  my dealer says dont come or are obsolete.  the parts guy was able to match it up for me and give me the plug and pins over the counter...


GREAT WORK!!!   THANKS     :2vrolijk_21:


Logged
2018 FLHTKSE ANV
Dominator prewired meathooks 10" (Nice, but shoulda got the 12's)
Dynojet Power Vision
GTS Radio upgrade
AG ATX-30-HD lithium battery
CoolFlow fan
Alloyboltz 12 point G8
INNOVV K2 X 2 DVR 4 Camera
AIM Clutch Slave

Harleypingman

  • 1K CVO Member
  • *
  • Offline Offline
  • Posts: 1101

Dave, Congratulations on a successful project.  I've enjoyed our telephone conversations along the way, and like you, my HK doesn't always return to the same mode after a shutdown, but I haven't tried to find a fix.

Ride safe.

Carl
Logged

Harleypingman

  • 1K CVO Member
  • *
  • Offline Offline
  • Posts: 1101

In lieu of installing the rider headset on the gas tank per the kit's instructions, a member used the left side mid-frame heat deflector to locate the rider headset connector on his SESG2.  Pictures are in this thread:

http://www.cvoharley.com/smf/index.php?topic=62448.0

I don't have mid-frame heat deflectors, and the connector on the tank doesn't bother me; but, it's a very clever alternative and, if you have the deflectors or prefer an alternative to the gas tank, one worth considering.

Carl

Logged

TD-SESG11

  • Newbie
  • *
  • Offline Offline
  • Posts: 28

Harleypingman,

Great write up on adding the CB.  I am going to add the CB & Intercom to my 2011 SESG2 this weekend,  I have already added the 6B connector when I added the XM to my bike, I assume that I need to add some pins etc to get the radio to recognize the CB. I have the NUOH and the BAMI kit just came in today... Question did you install just the two wires that go to the PTT or change out the complete harness in the handlebars, also did you have to remove the complete faring to do this?  This part seems like it will be fairly time consuming with not much room to work and if I need to actually remove the fairing.

Sure seems like a whole lot of wiring harness to route around the inside of this fairing  ::)    Will never figure out why HD doesn't make a lot of this stuff plug & play, obviously the people on this site have figured out a lot more than some of the folks at HD, no one at the shop seemed to have any answers for me.

Just hoping I haven't gotten in over my head here, the XM seemed easy compared to this.
Logged

TD-SESG11

  • Newbie
  • *
  • Offline Offline
  • Posts: 28

2nd picture showing  CB & XM mounted below the radio -
Logged

Harleypingman

  • 1K CVO Member
  • *
  • Offline Offline
  • Posts: 1101

After you made the 6B connector, and successfully added the NUOH w/ XM, you're done adding wiring to your bike (but see note below); the BAMI kit's electrical components will be plug and play connections as will the CB module.  The HK will recognize the CB because the CB module connector (which includes a pair of wires for CAN + and -) plugs into the NUOH (which connects to the CAN + and - pinouts of the HK at pinouts 13 and 14). 

The BAMI kit includes a new left side handlebar switches assembly:  switch housings (black), switches, harness, and connector) and you'll remove the OEM handlebar switch assembly and replace it with that supplied in the BAMI kit.  Since you have chrome housings, you'll need a new left lower chrome housing.  And you'll need to transfer the switches from the supplied black housings to the OEM left upper chrome housing and new lower left chrome housing.  As you mentioned, you could remove the PTT switch and wires from the assembly provided in the BAMI kit and add it to your OEM switches, but you'll still need a new lower left housing to accommodate the PTT switch.

NOTE:  I don't have handy a wiring diagram showing the left handlebar switch harness connected to the main harness, so I can't be certain that the wiring in the main harness (where it connects to the left handlebar switch harness) is complete for your purposes; it may need two additonal wires for the PTT switch.  I'm sure you can PM TIF2 (Rich) and he can supply the answer; I'll try to visit my dealer later today and report.

As for space inside the fairing, it's very tight and you may find, as I did, that it took several cycles of removing and installing the fairing and rearranging the wiring to reach a point where the outer fairing would install with virtually no resistance from the wiring inside the fairing.  My experience was that the more connectors I could arrange around the sides of the radio and/or atop the radio/modules the better; anything directly in front of the radio or slightly below was problematical, so anything below the radio needed to be well back towards the fairing skirt.

Good luck with your project.

Carl

Logged

rutterzcvo

  • Newbie
  • *
  • Offline Offline
  • Posts: 8

Carl,
I too used your write up to do the install on my '11 SESG.  Thanks so much for taking the time to help all of us out with this addition.

I, however, ran into a problem with the switch housing wiring included with the BAMI kit. I elected to install the complete new harness with a new bottom chrome housing as you have indicated.  From my view this was going to be the easiest.  The problem was discovered after the install and with everything working.  I now had a b1154 clutch switch shorted to ground code.  The result was no 6th gear indicator in the speedo, the cruise no longer worked and the bike would now start in gear.

The problem was in the clutch switch itself.  I came to learn there are two different clutch switches. :nixweiss:  One normally open and one normally closed.  

To solve the problem the new clutch switch in the BAMI harness was swapped with the original clutch switch I had removed from my bike.  Now everything works properly.

Not sure if this will happen to anyone else but I thought it would be worth mentioning here.

If I were to do this again I would go the route of just adding the new PTT wiring to the left handlebar control and leave the original wiring intact.  One other note...I noticed the left handlebar wiring harness in the BAMI was a bit shorter and prevented me from re-attaching the left handlebar connector inside the fairing back to the mounting stud.

Hope this will help someone if they encounter this issue.
« Last Edit: September 07, 2011, 11:10:08 AM by rutterzcvo »
Logged

TD-SESG11

  • Newbie
  • *
  • Offline Offline
  • Posts: 28

Carl,

As I mentioned in the earlier post that I had installed the XM and that it does function correctly.  Now when I did that install I thought that I had supplied the Can + & Can - in pin 13 & 14 for the XM in J28 (35 pin connector), does that supply the power to the CB as well?  If so I must have other issues as the radio did not recognize/discover the CB.

I have not completed or started the other connections with regards to the BAMI kit, not sure if that affects if the HK will discover the CB unit.   I also saw the TIF2 had mentioned that he had to install a couple of new wires into J27 for everything to work correctly, what I was not sure of is if that was necessary if I had installed the NUOH I do not see that Pin 2 or 15 are empty in my J27.

Thanks!
Logged
Pages: [1] 2  All
 

Page created in 0.25 seconds with 25 queries.